Living Life Fast M140i Feature!
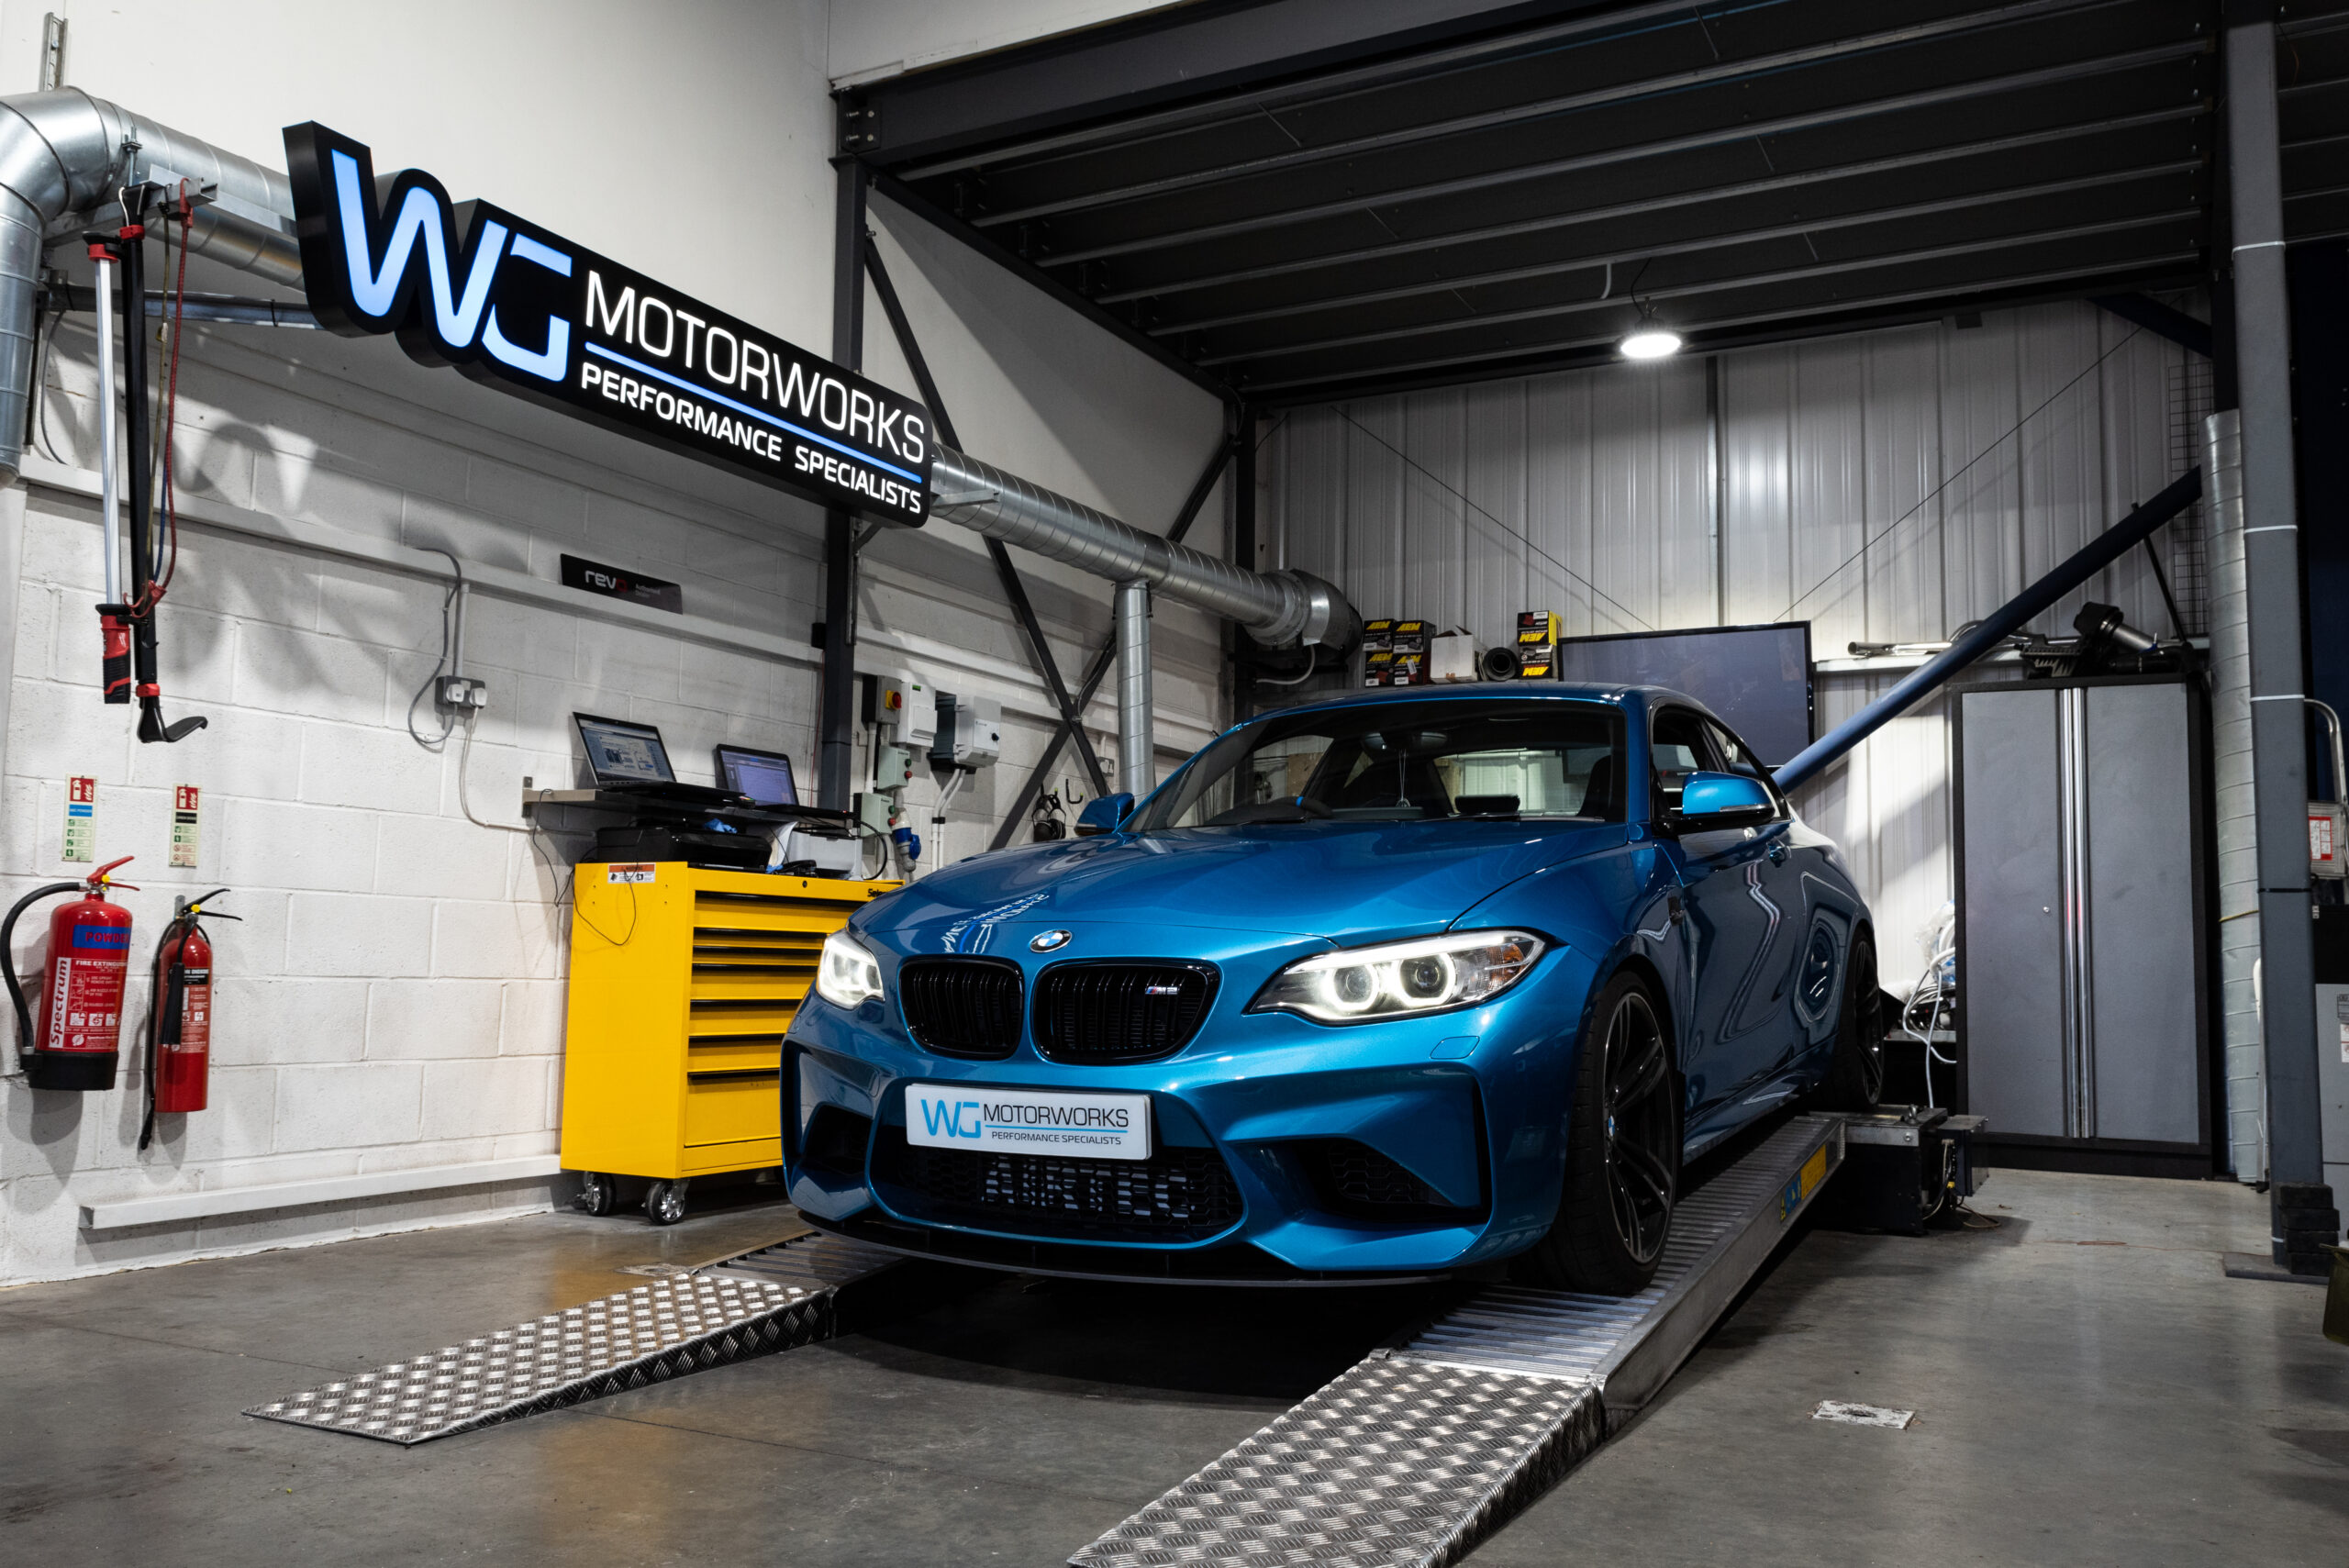
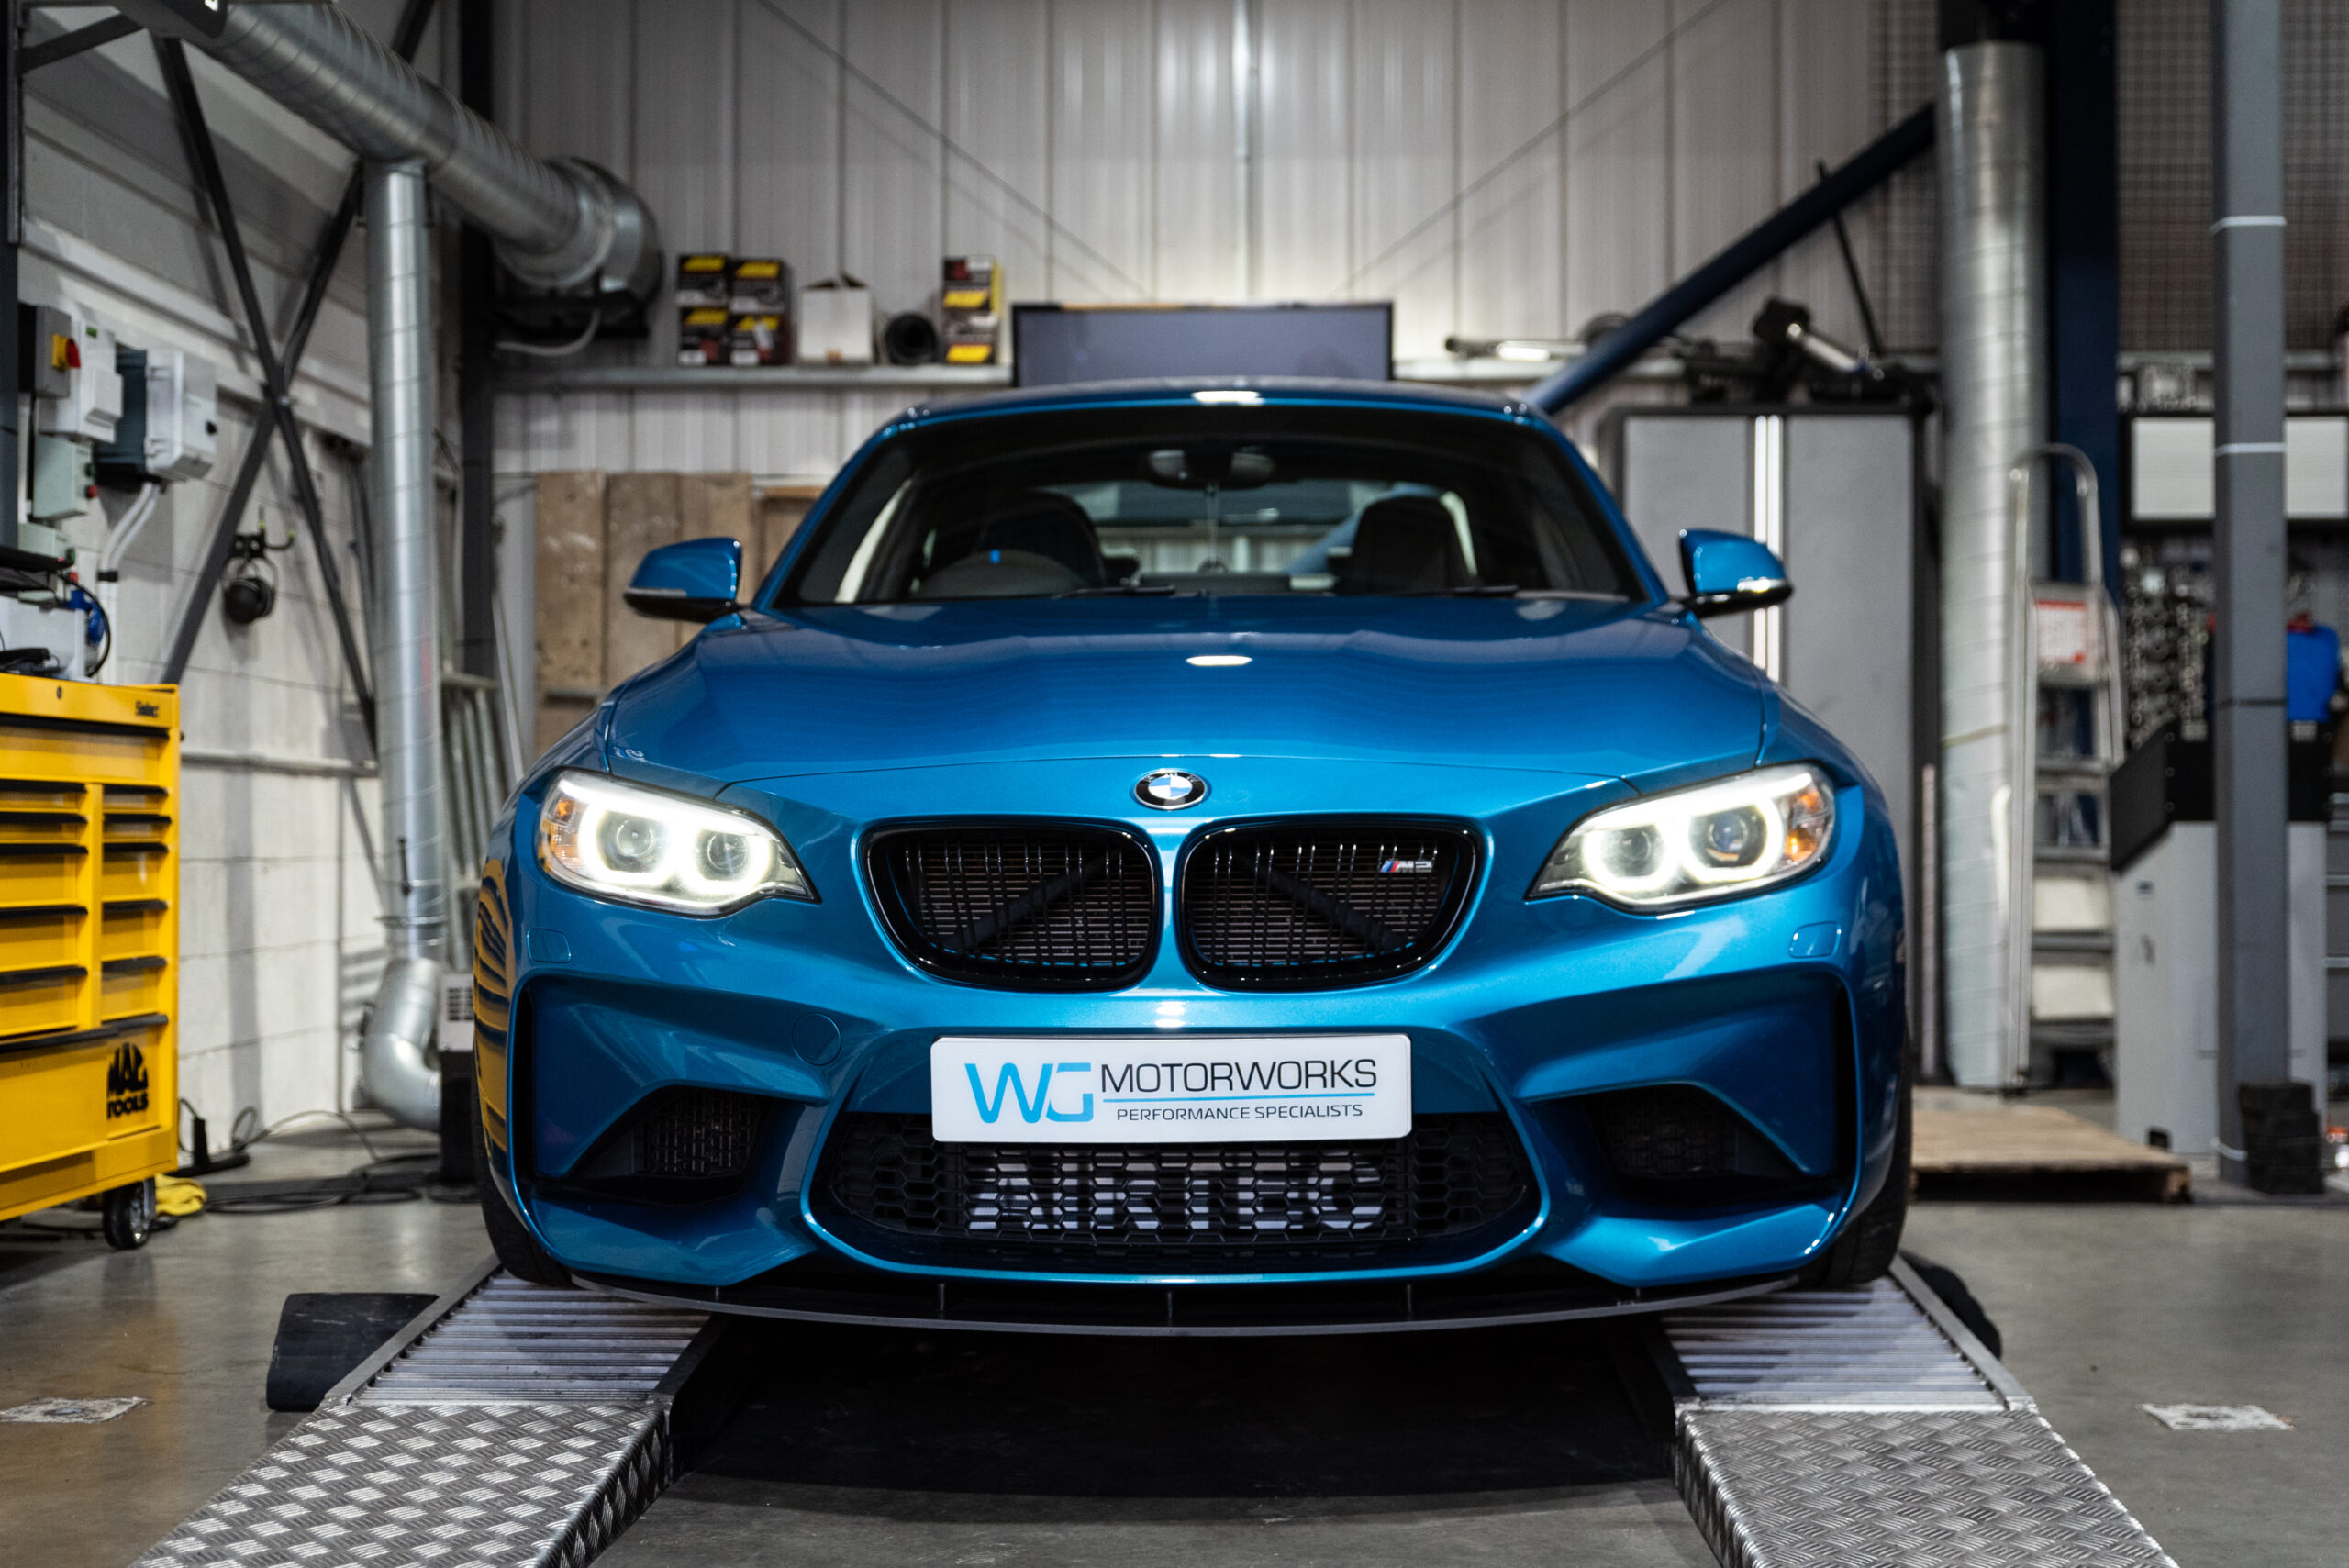
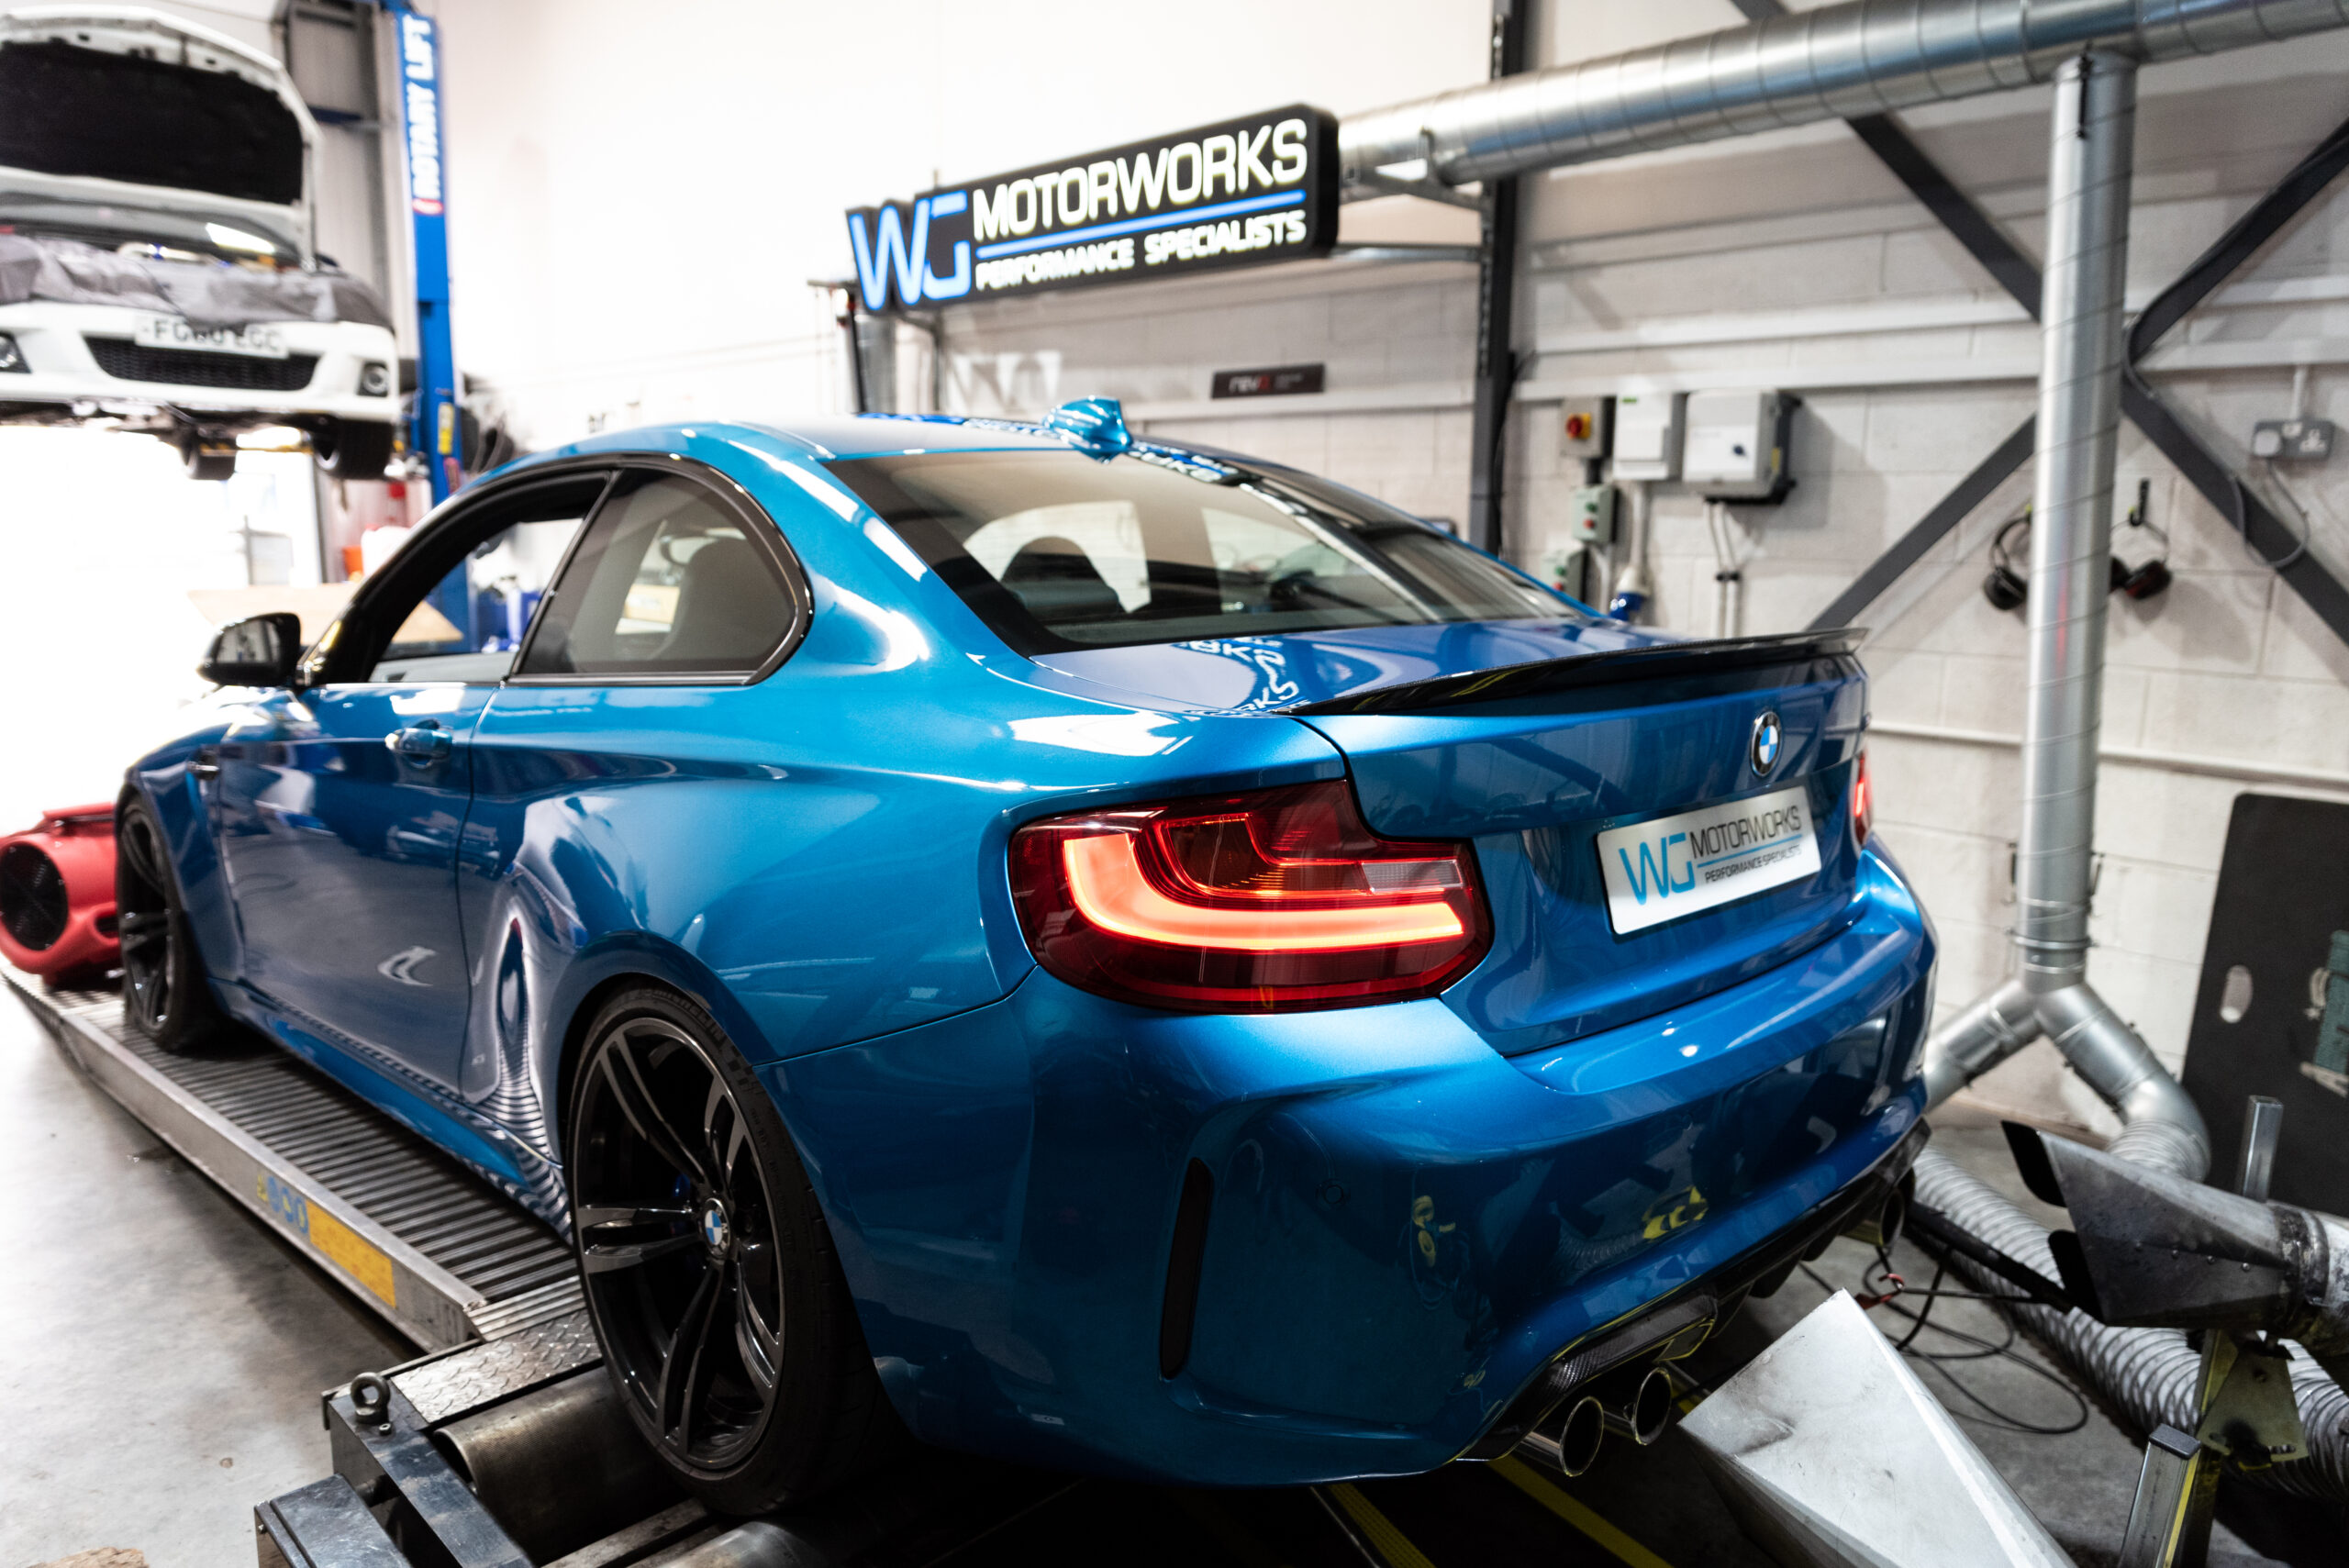
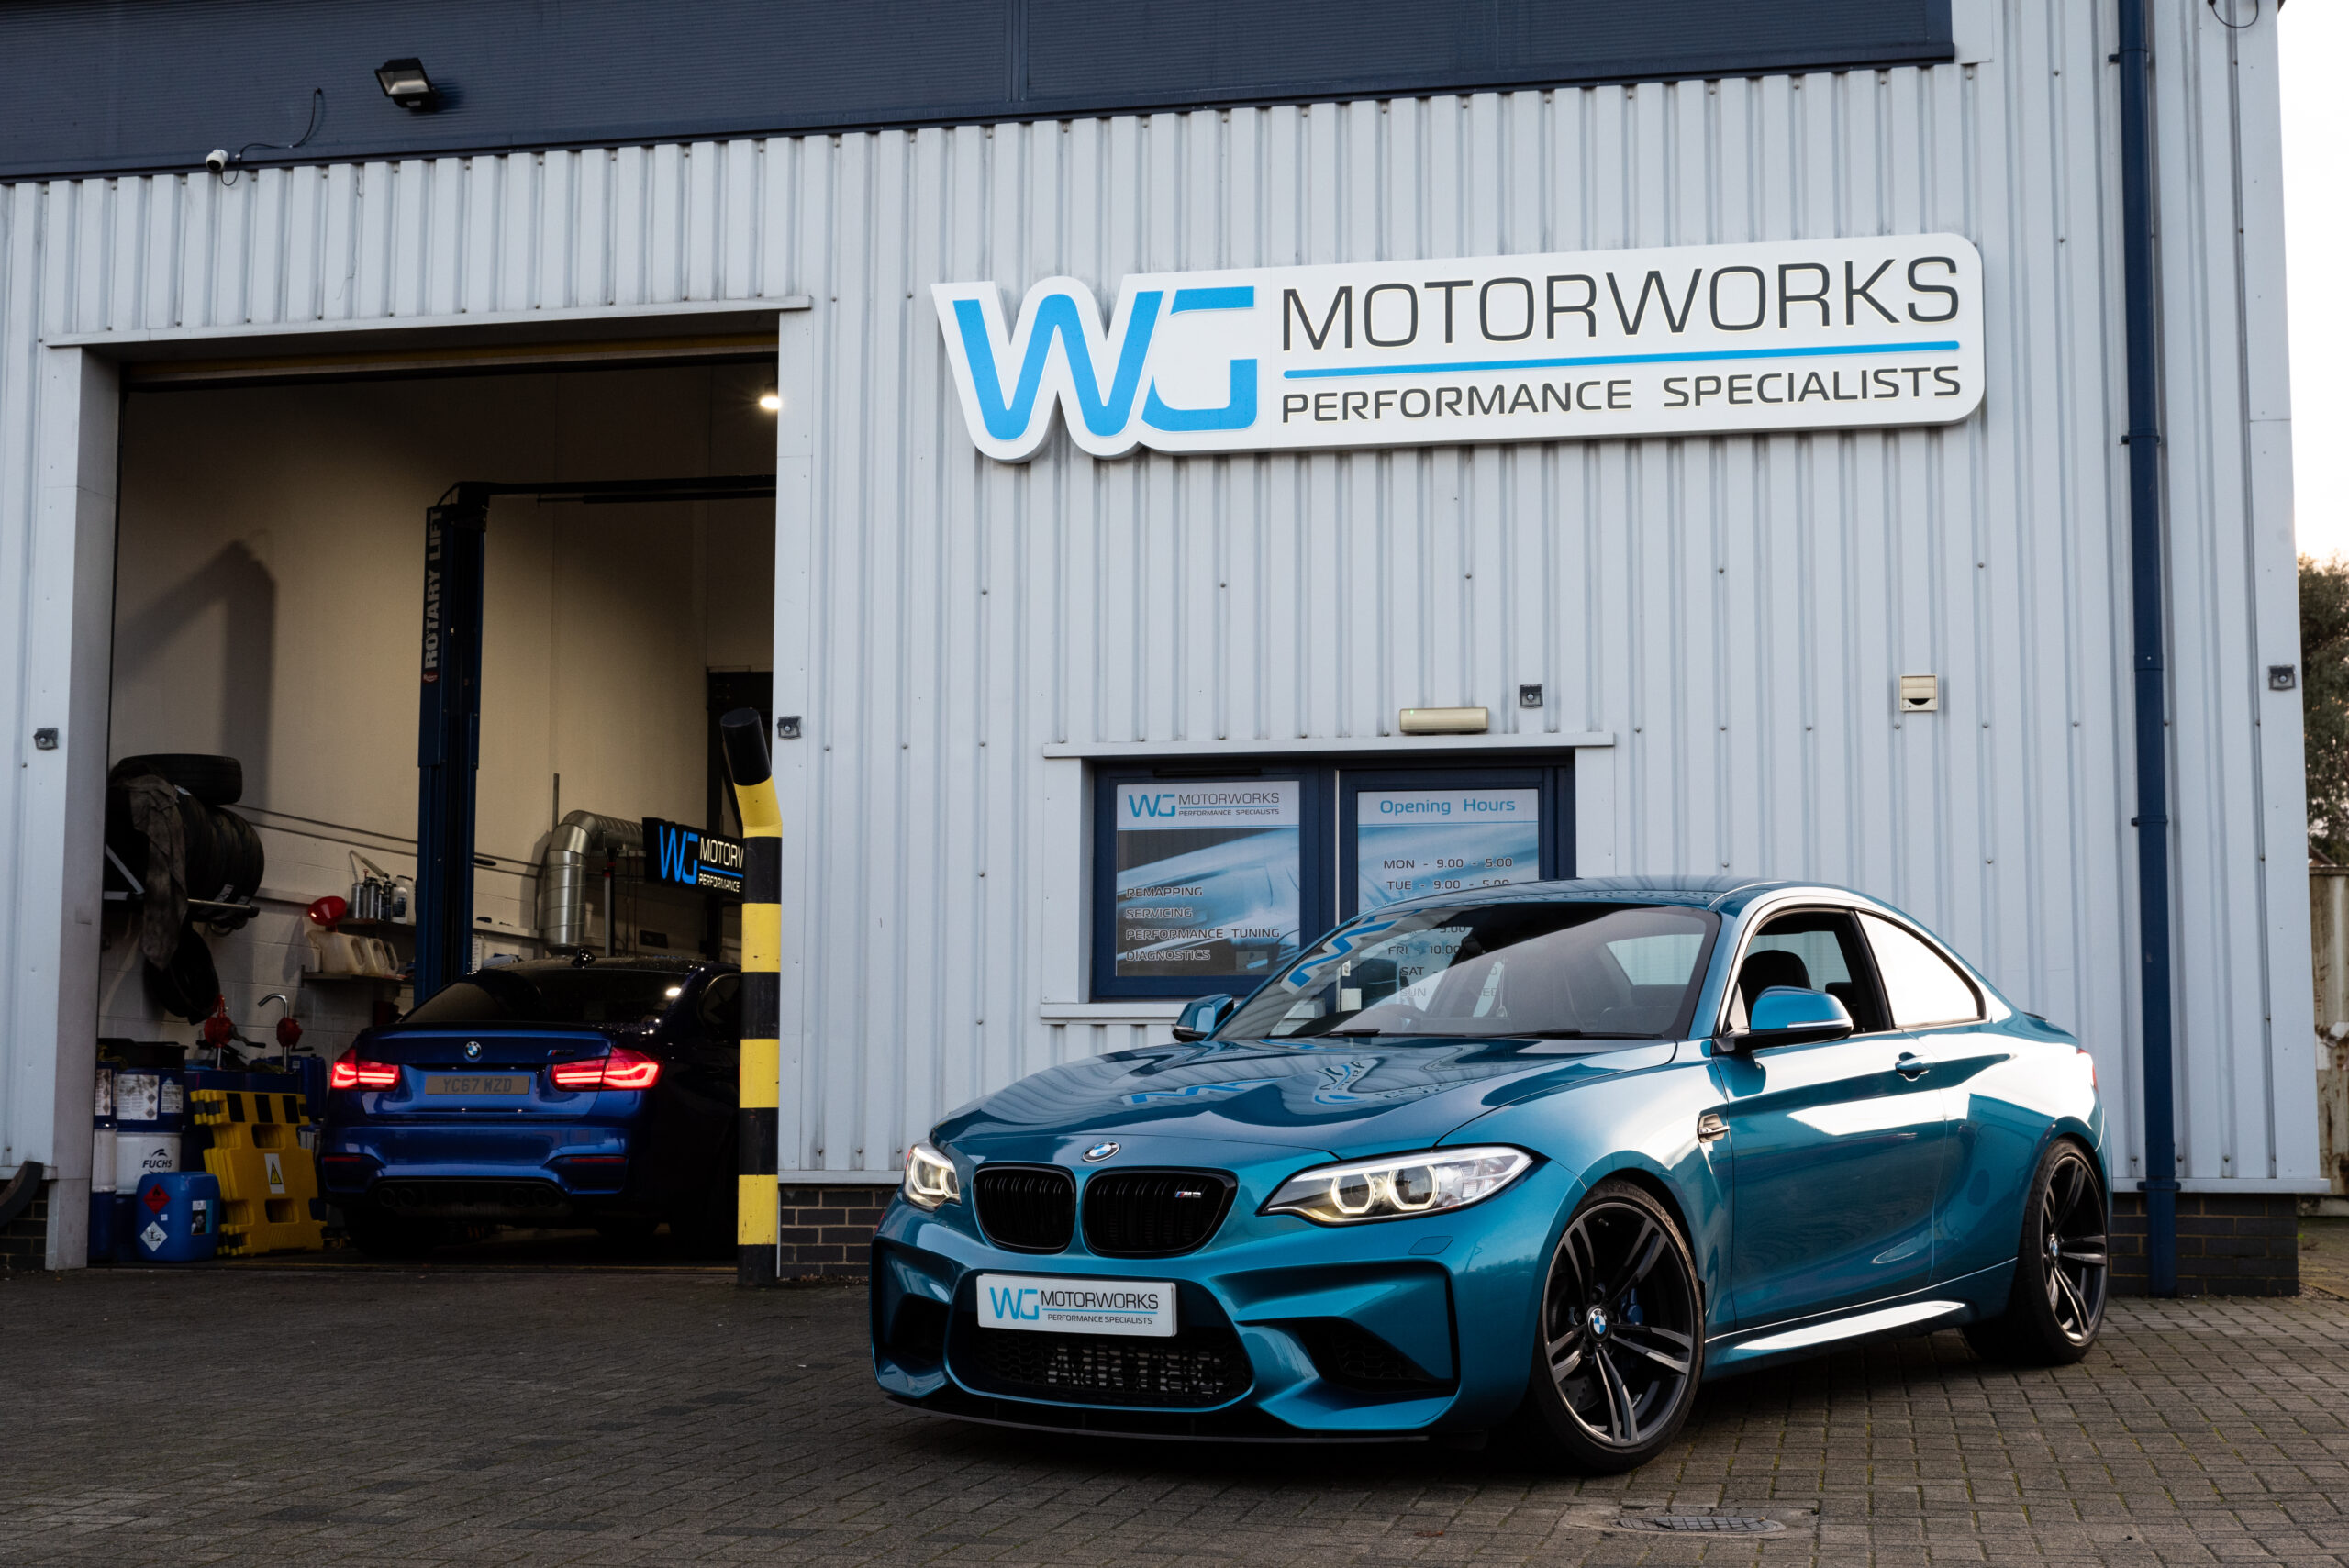
BMW M2 OG Tuning – Standard to Stage 2 in a day!


Rabbid ROM ECU Software information for Corsa D & Astra H VXR ECU’s
Rabbid ROM – Boost Control and AFR
* What the problem is with the factory ECU
* What results from the problems
* What Rabbid ROM solves
* How Rabbid ROM solves it
* Proof, and how to check if you’ve been conned into a sensor that won’t work.
The Bosch ME7 ECU is a long standing beast in the automotive world used by many brands of cars and it’s what powers the Astra H VXR, Corsa D VXR etc and similar engined cars.
It’s design in late 90’s early 2000’s never really expected road cars to run more than about 1 bar of boost if that. So when the designers made it, a boost control range of 1.5 bar boost (or from now on 2.5 bar absolute pressure) seemed like plenty.
First of all, why is there a limit in the first place? Well this down to computer memory, and scaling vs resolution. There are two types of pressure values in the factory 16 bit values, and 8 bit values.
In basic computer terms an 8 bit value can count up to 0 to 255 and a 16 bit value can count from 0 up to 65535. You can scale these numbers to change the range, but scaling up will lower the resolutions or larger steps between numbers and scaling down will increase the resolution or smaller steps between numbers.
Great 65535 range so that’s 65535mBar that’s like 64 bar boost right? Expect no unfortunately not, to get more precision these ranges are scaled down by factors to allow you to have smaller steps between values, so rather than count in 1’s you could factor it down by 0.1, so you could count in steps of 0.1, but then your maximum value would be 6553.5.
Here is where the problems begin, all pressure calculation in the ME7 when in 8 bit are factored by 10, that means with 0-255 it can count 0 to 2550 mBar of pressure but in steps of 10mbar. This is used by low priority tasks such as displaying to diagnostics, hence in Tech 2 / Opcom we see boost in KPA
The 16 bit values are unfortunately scaled by a factor of 0.0390625. That means that while we can measure boost in fractions of 0.04mBar (which is way OTT) we can only count to 2560mBar with 0 to 65535.
This means target boost, actual boost, estimated intake manifold pressure, etc all cannot count above this. This means once you cross this line, the car does not know the boost is there. It cannot control it in closed loop anymore.
Secondly, the fuelling while it does come from engine load calculated from the MAF, it also goes through some mathematics which converts it into an estimated intake manifold pressure. This also cannot count above 2560mBar which means you start to lean out once you hit higher boosts.
Tuners for years have been fitting 3 / 3.5 / 4 bar MAP sensors to the cars, makes sense, and it’s logical right? More boost scale in a sensor that fits?
For sure you can properly scale the sensor in so the voltage output from it get’s scaled to the correct pressure reading, but what all of them have failed to understand is the internal ECU mathematics and memory limits, once you cross the 2560mBar line, all values would be scaled down and pegged at 2560mBar.
I say this bluntly – on all mapping by anyone, before Rabbid ROM, fitting an uprated MAP sensor was pointless hence we didn’t bother. If you were told you needed one, you were either conned, or someone didn’t understand the ECU in detail.
In a Closed Loop boost control system, the car has target pressure, a rough starting point for the boost control solenoid then checks to see how close it is and fine-tunes your boost until what it measures is what it wants. This means you can demand different boost levels whatever you want, such as less in low gears etc.
However this only works, if your control system can read and request the levels you want, it also requires some headroom to catch overboosts. This does not happen once you hit or get close to the 2560mBar boost limit.
To work around this, tuners have boost in Open Loop modes, this means you physically limit the boost control solenoid output to roughly the boost you want. However, if it goes higher or lower, you just don’t care nor do anything about it.
The problem with this is if the weather changes, altitude changes or you change to different gears, engine loads such as climbing hills, the actual boost you get will be different, also being unable to max the boost control during spool to scramble the turbo, you generate lag on spool and gear change.
By using Rabbid ROM you can also properly control boost up to 4 bar as if it were a factory car running 1 bar.
As mentioned before fuelling also suffers from this, as MAF readings are converting into an estimated manifold pressure, which also cannot count above 2560mBar. This also means you lean out and therefore corrections are applied to the injectors so that when you hit the limit you squirt some extra fuel in.
But if you think about the problems with boost levels changing you’ll also realise this causes major issues with fuelling if boost changes.
If you underboost you could run overly rich, even splutter or misfire, if you overboost you could lean out. There is a fine balance for the “fuel correction” method to get a car to run good, and while we’ve done a good job in the past, we’ve always said it’s a bit of a bodge to run high power cars.
Rabbid ROM let’s the ECU calculate it’s estimated intake manifold pressure up to 5 Bar absolute pressure (4 Bar Boost) This mean’s that MAF’s as large as you can reliably make will properly fuel your car as if it were a stock car.
So how do we actually solve it in Rabbid ROM?
Well simply it’s a case of scaling, all mathematics in the ECU program code have been reworked with alternative scaling, this allows the 8 Bit values to now count to 5110mBar (511KPA) and the 16 Bit values to now count to 5120mBar, hopefully more than you’ll ever need.
But scaling alone does not work, there are many modules in the software which convert from load, or air flow into pressure, and back again etc, there are comparisons with barometric pressures and ratio calculations which all had to be recoded and reprogrammed in order to make this work.
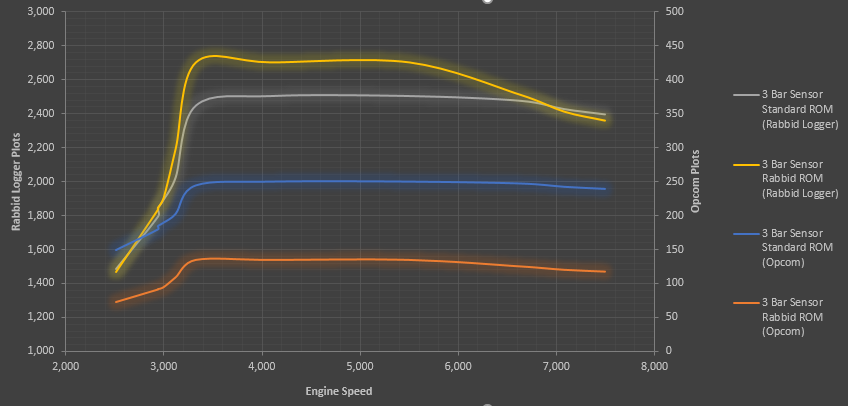
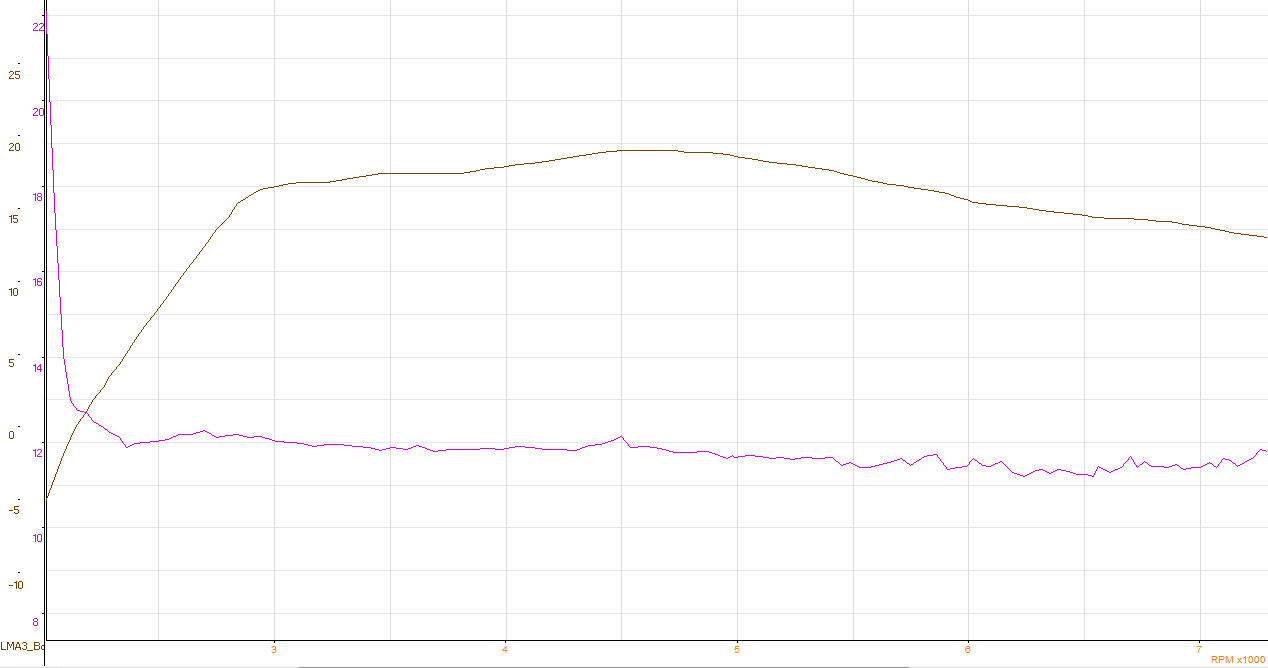
The attached graph shows a car boosting outside of the normal range with both factory software, the car peaks to 1.8 bar of boost then we’ve dropped down into 1.4 bar to show the sensor maxing and coming back into range.
To do this test we locked the boost control solenoid to 60% duty to ensure boost was the same on all runs. We’ve logged with Rabbid Logger and then we’ve also logged with Opcom to show you how to test your own car.
The yellow line shows boost pressure with Rabbid ROM, the grey line shows the boost pressure with a normal map and you can see it flat lines at around 2560mBar. The ECU is at this point leaning out, and would be unable to stop the boost going out of range if it were in control.
But let’s not just believe me or any tuner, let’s teach you how to prove it yourself.
Opcom is a clone of Tech 2 and commonly used to diagnose cars by enthusiasts. Here we’re showing you how to see if your 3 Bar MAP sensor is actually working or not.
If you start the car and look at boost control it would show approximately 100KPA of absolute air pressure, if this is the case your sensor is correctly scaled in, if you see around 85KPA or 112KPA you’re running the wrong sensor for your remap and your tuner has already failed the first step.
If you then record a run at full boost you’ll see that it will never count higher than 255KPA (1.5 bar boost) even if you have a boost gauge showing more.
When you run Rabbid ROM, Opcom doesn’t know about the scaling that’s happened so all values you record and see on the data screens will be exactly half of the real life values.
When your car is at idle you should see 50KPA, once you’re on boost you should then see half of the absolute pressure your car makes, let’s say you run 1.8 bar of boost, that’s 280KPA you should see 140KPA on the screen.
If you do not see halved values like this, your 3 Bar MAP sensor is doing nothing for you, if you were told you needed it, someone was just trying to make money for nothing, or they do not understand your ECU.
If they claim they can do the same as Rabbid ROM, then values should be halved and if they’re not, you’ve been lied to again.![]() 😉
😉
To this day, we’re the only Opel/Vauxhall tuner to have achieved such modifications to the factory ECU, so if you’re looking for a big power car, there is only one logical choice for mapping – Rabbid ROM.
Rabbid Remaps explains why peak power isn’t everything!
Ever seen two cars claiming the same figures yet one can just pull away? Or ever seen a car claiming less figures but is all over a car claiming more?
I repeatedly hear many tails of joy from repeat customers when they come back about how impressed they are with what their car can compete with and compare with, but they’re surprised because they’re comparing top trumps, which is the peak figures.
Many people see their peak number and instantly decide whether they’re happy or unhappy with the result, but there is far more to the story than this.
Let’s compare 2 Astra J VXR’s one from Rabbid Remaps, another from a third party. Both cars make approximately 400LbFt of Torque and 330HP.
However as I alluded to yesterday many tuners are not aware of nor able to modify a number of ECU limiters which cause the power to dive bomb after 5800RPM. In fact some may just cut your graph off at 6000RPM to hide it.
While peak figures are the same, area under the curve, and the length of the power bands are different. This has a great effect on how a car performs, and how it should be driven to get the optimum out of it.
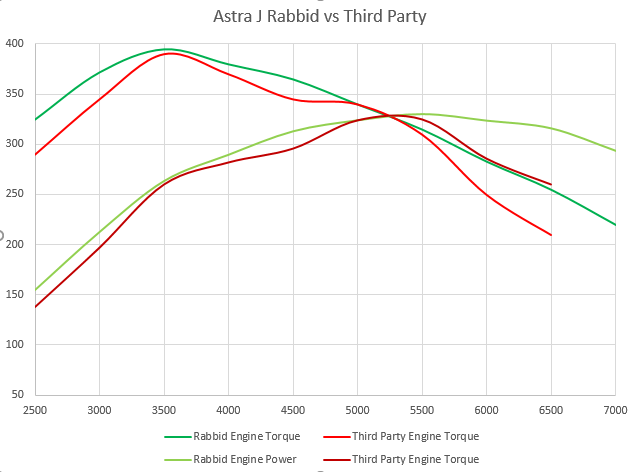
The first image shows the two power and torque curves over laid, as you can see both have pretty similar peaks, but the Rabbid Remaps tune is able to hold power and rev out further without losing it. Green in all images will be Rabbid Remaps and Red will always be the third party tune.
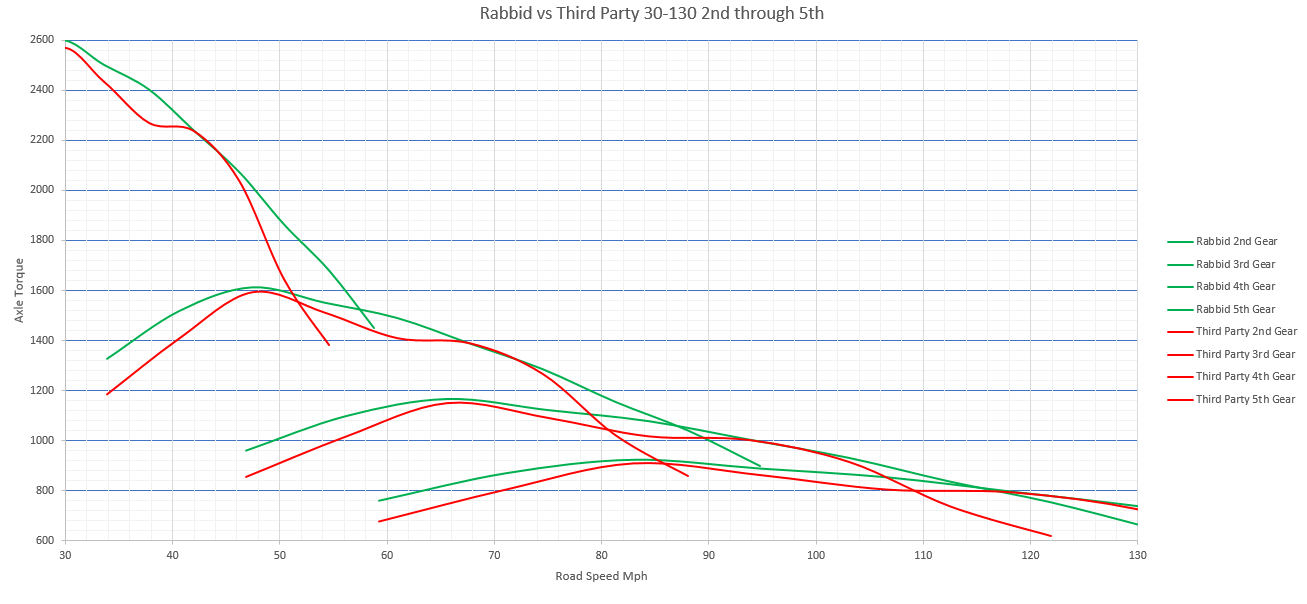
Now move to the second image, this shows how the engines torque is converted through the gear ratios of the gearbox and final drive into an axle torque. This is the torque which is sent to the drive shaft.
The image shows a 30 to 130 run, starting at the left the highest lines are 2nd gear and the ones lowest starting to the right are 5th. The left shows the axle torque level and bottom axis shows the road speed.
Let’s analyse what happens, as soon as the race starts the red tune starts to lose torque around 38mph, at this point the green tune would pull ahead.
Both cars then come onto 400LbFt at the engine peak torque around 45MPH but this is where things start to get interesting.
While the red car starts to lose axle torque again, by 52MPH it has dropped below that of what 3rd gear could produce and in order to remain at it’s best it must shift up to 3rd.
The green car however still is able to produce good torque and at 55Mph there is a clear advantage in axle torque.
Remember torque is what accelerates you, the higher the torque at any road speed the more acceleration is available to you at that road speed.
We can also use image 2 to show the optimum shift points for each car.
Green:
2nd -> 3rd 58MPH
3rd -> 4th 88MPH
4th -> 5th 116MPH
Red:
2nd -> 3rd 52MPH
3rd -> 4th 80MPH
4th -> 5th 108MPH.
Every time you change up a gear, you lose axle torque in order to gain more axle RPM from engine RPM. This is the main reason your car will feel slower each time you go up a gear. You lose acceleration to gain a higher available top speed.
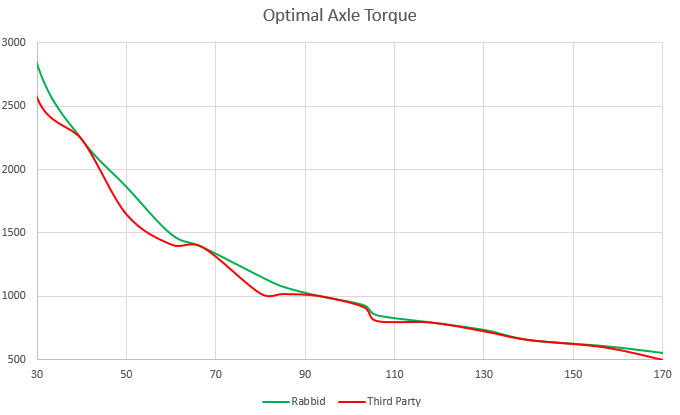
Now look at image 3, from the data we produced in image 2 we can work out the maximum available axle torque assuming you changed at the optimum points.
You can clearly see that the red car, again while having the same peak figures on it’s stats sheet, it indeed shows lower rates of acceleration at many road speeds.
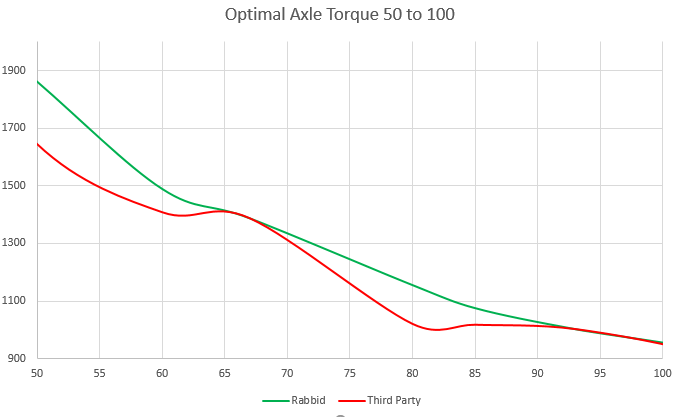
Image 4, shows a zoomed in section from 50MPH to 100MPH, this is an area you’ll spend a lot of time in during a track day or even fast road driving. The difference in maximum available acceleration is clear, at 50MPH and 80MPH there is a big difference.
In reality it’s power band and area under the curve that really matters, not a peak figure. This goes to show that if you’re buying a tuning package or a remap based on just a claimed figure, you could be missing out on potential performance.
We only dyno tune cars because we believe that it’s the only way to ensure we create the best area under the curve reliably. While you can setup cars on the street you cannot ensure that the torque and power curves are smooth, thus we just don’t offer it.
Corsa E VXR
WGM Corsa E VXR Engine Tuning
The Corsa E VXR follows in similar footsteps of its older brother, the Corsa D VXR. Both generations of the VXR have a lot of similar components including engine, drivetrain and chassis
The 1.6 turbo-charged engine has been retained, however one key change for us is the Engine Control Unit (ECU), which is now completely different, running a torque-based AC Delco E83, opposed to the Bosch ME7 used earlier in the VXR range. From its predecessor, power output has been increased to 205PS and Torque raised by 36LBFT across the rev range,
For those who are new to the VXR range or not knowing about the 1.6 Turbo engine, like most things in life, there are good and bad points! In the standard form, the engine internals are not deemed strong, often been referred to as having ‘chocolate pistons’ . However, once the cast pistons and connecting rods are replaced with superior forged items, running 400HP+ and 8000rpm+ becomes easy work for this high revving short stroke engine. In Fact, these engine are turned into a tuner’s delight!
In collaboration with Rabbid Remaps, we have been developing software and hardware Packages for the B16LER Engines.
With Rabbid Remaps initial Research and Development Stages, we found:
– The factory calibration is extremely rich (down between 9:1 to 10:1), and it appears to have errors in the MAF calibration. After re-calibrating and straightening out the air fuel ratio, good economy gains should be seen
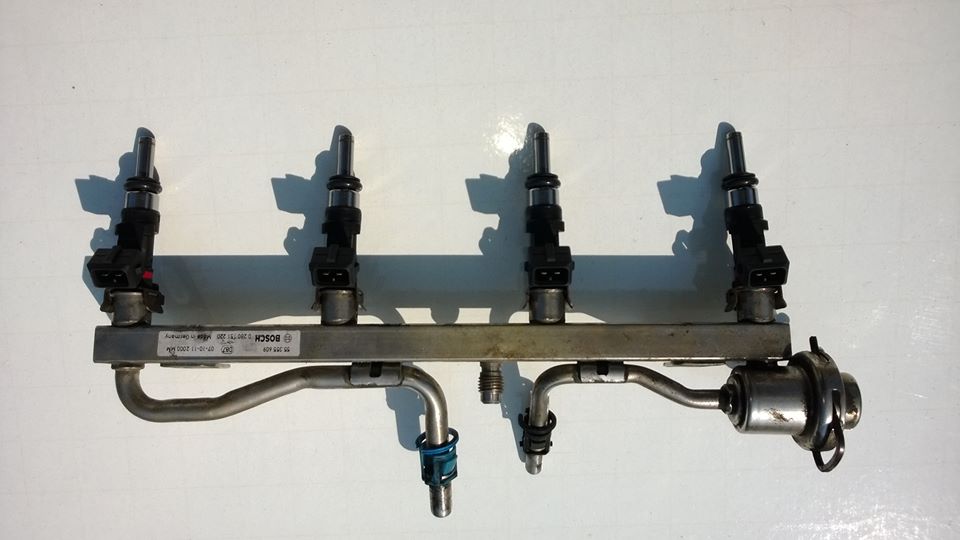
– The Corsa D injectors were maxed out by Stage 1, whereas good news on the Corsa E is that Vauxhall have fitted it with ~345cc injectors as standard. which should comfortably see around 260HP before changing
– The stock intercooler is also very poor, we observed over 80C intake temperatures in 30C ambient conditions and over 65C in 20C outside temps. The car quickly begins to heat soak, therefor an uprated intercooler would make a good addition to keep the power consistent
– We discovered that the new style MAF sensor fitted to the car maxes out at ~220HP with a Stage 1 remap. Therefore to safely tune above 220HP an uprated MAF sensor pipe will need to be installed. We would consider it dangerous to tune further without one, to avoid symptoms such as lean running, knock, or even engine failure
Features that we can access for the AC Delco ECU:
– Larger Injector Calibration, which is required when running over 260HP
– Larger MAF Sensor Calibration, which is needed for over 225HP
– Closed Loop Boost Control, Upto 2 Bar Currently
– Catalytic Diagnostics Delete
– Rear O2 Sensor Delete
With all this in mind, our development began with a stage 1 software only upgrade.
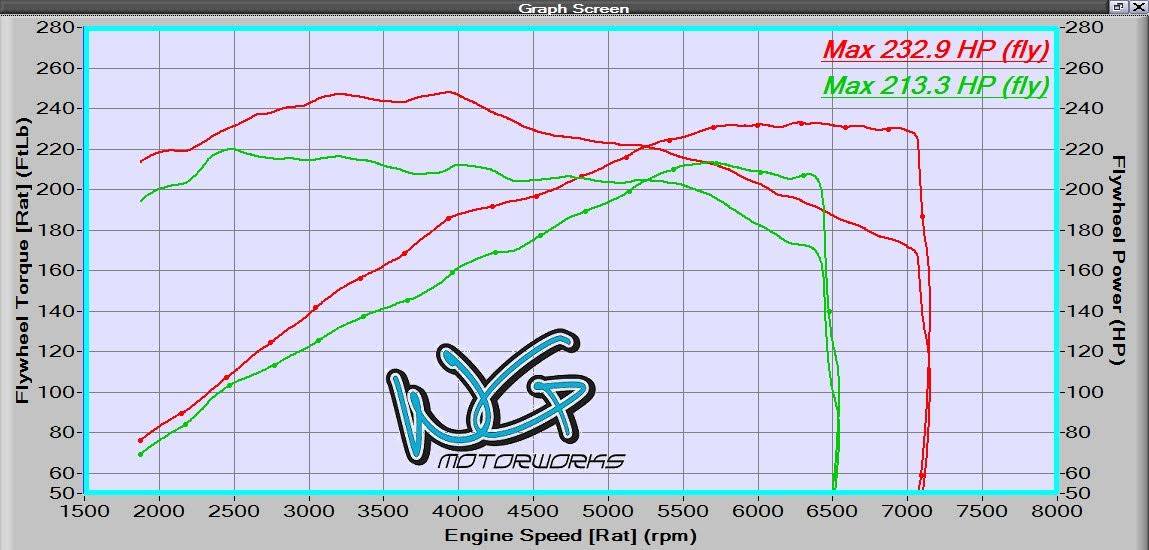
WGM Stage 1 –
Multiple dyno runs of both of our development cars, along with intensive ‘real life’ testing on the road, saw gains of exactly 20HP over standard at peak figure, with under the curve gains of 30HP / 40TQ. This was as far as we could push the car without upgrading the intake, due to the MAF maxing out.
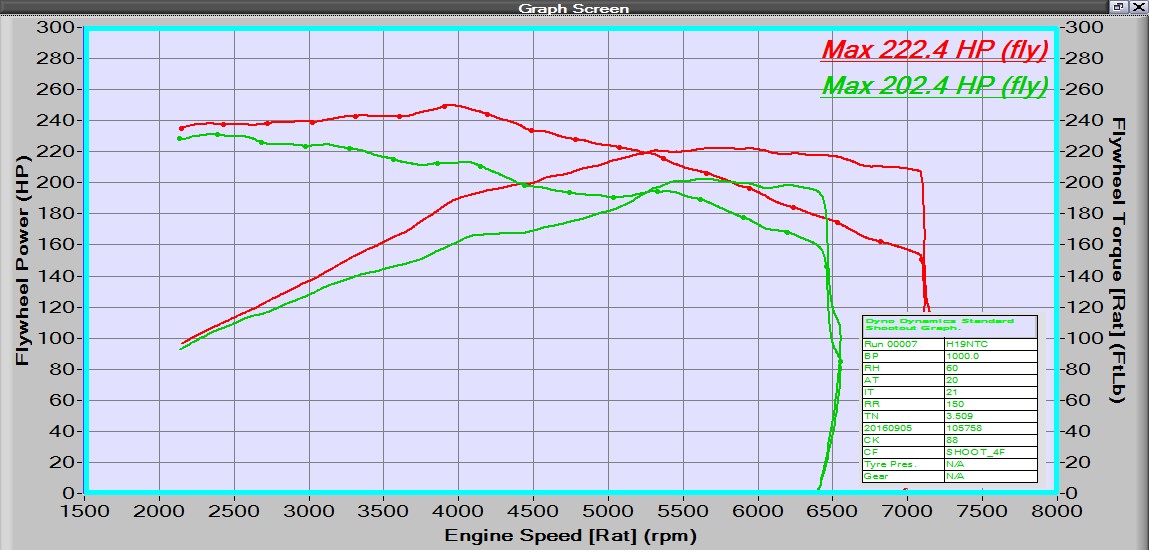
Rabbid Remaps ECU Software only upgrade transforms the mid range punch from the ko3 turbocharger, by optimising boost, AFR and ignition timing gaining 30-40lbft with Peak gains 17-22HP
215-225HP / 230-240TQ
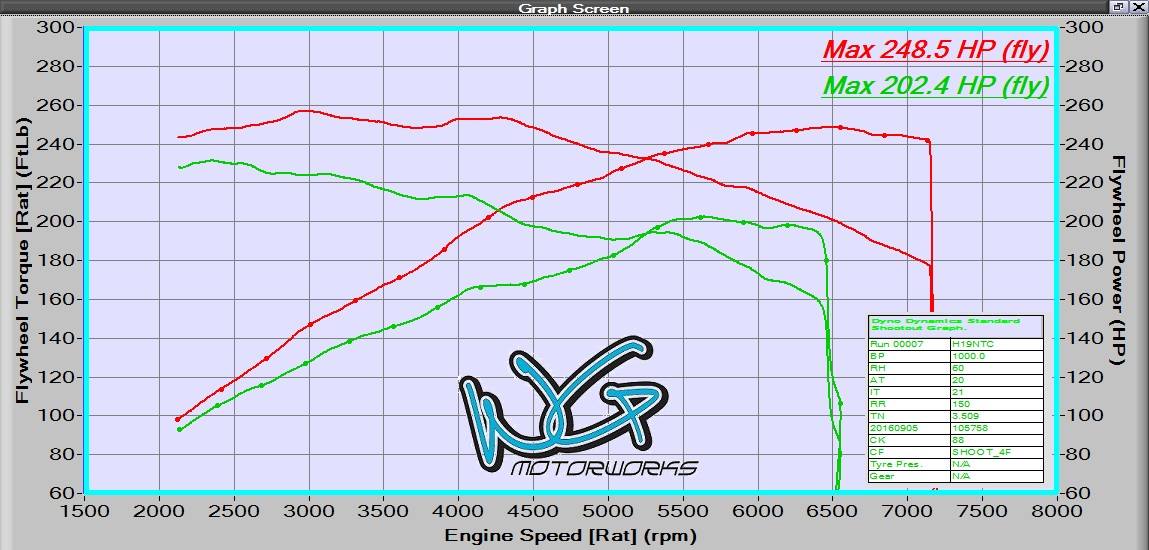
WGM Stage 2 –
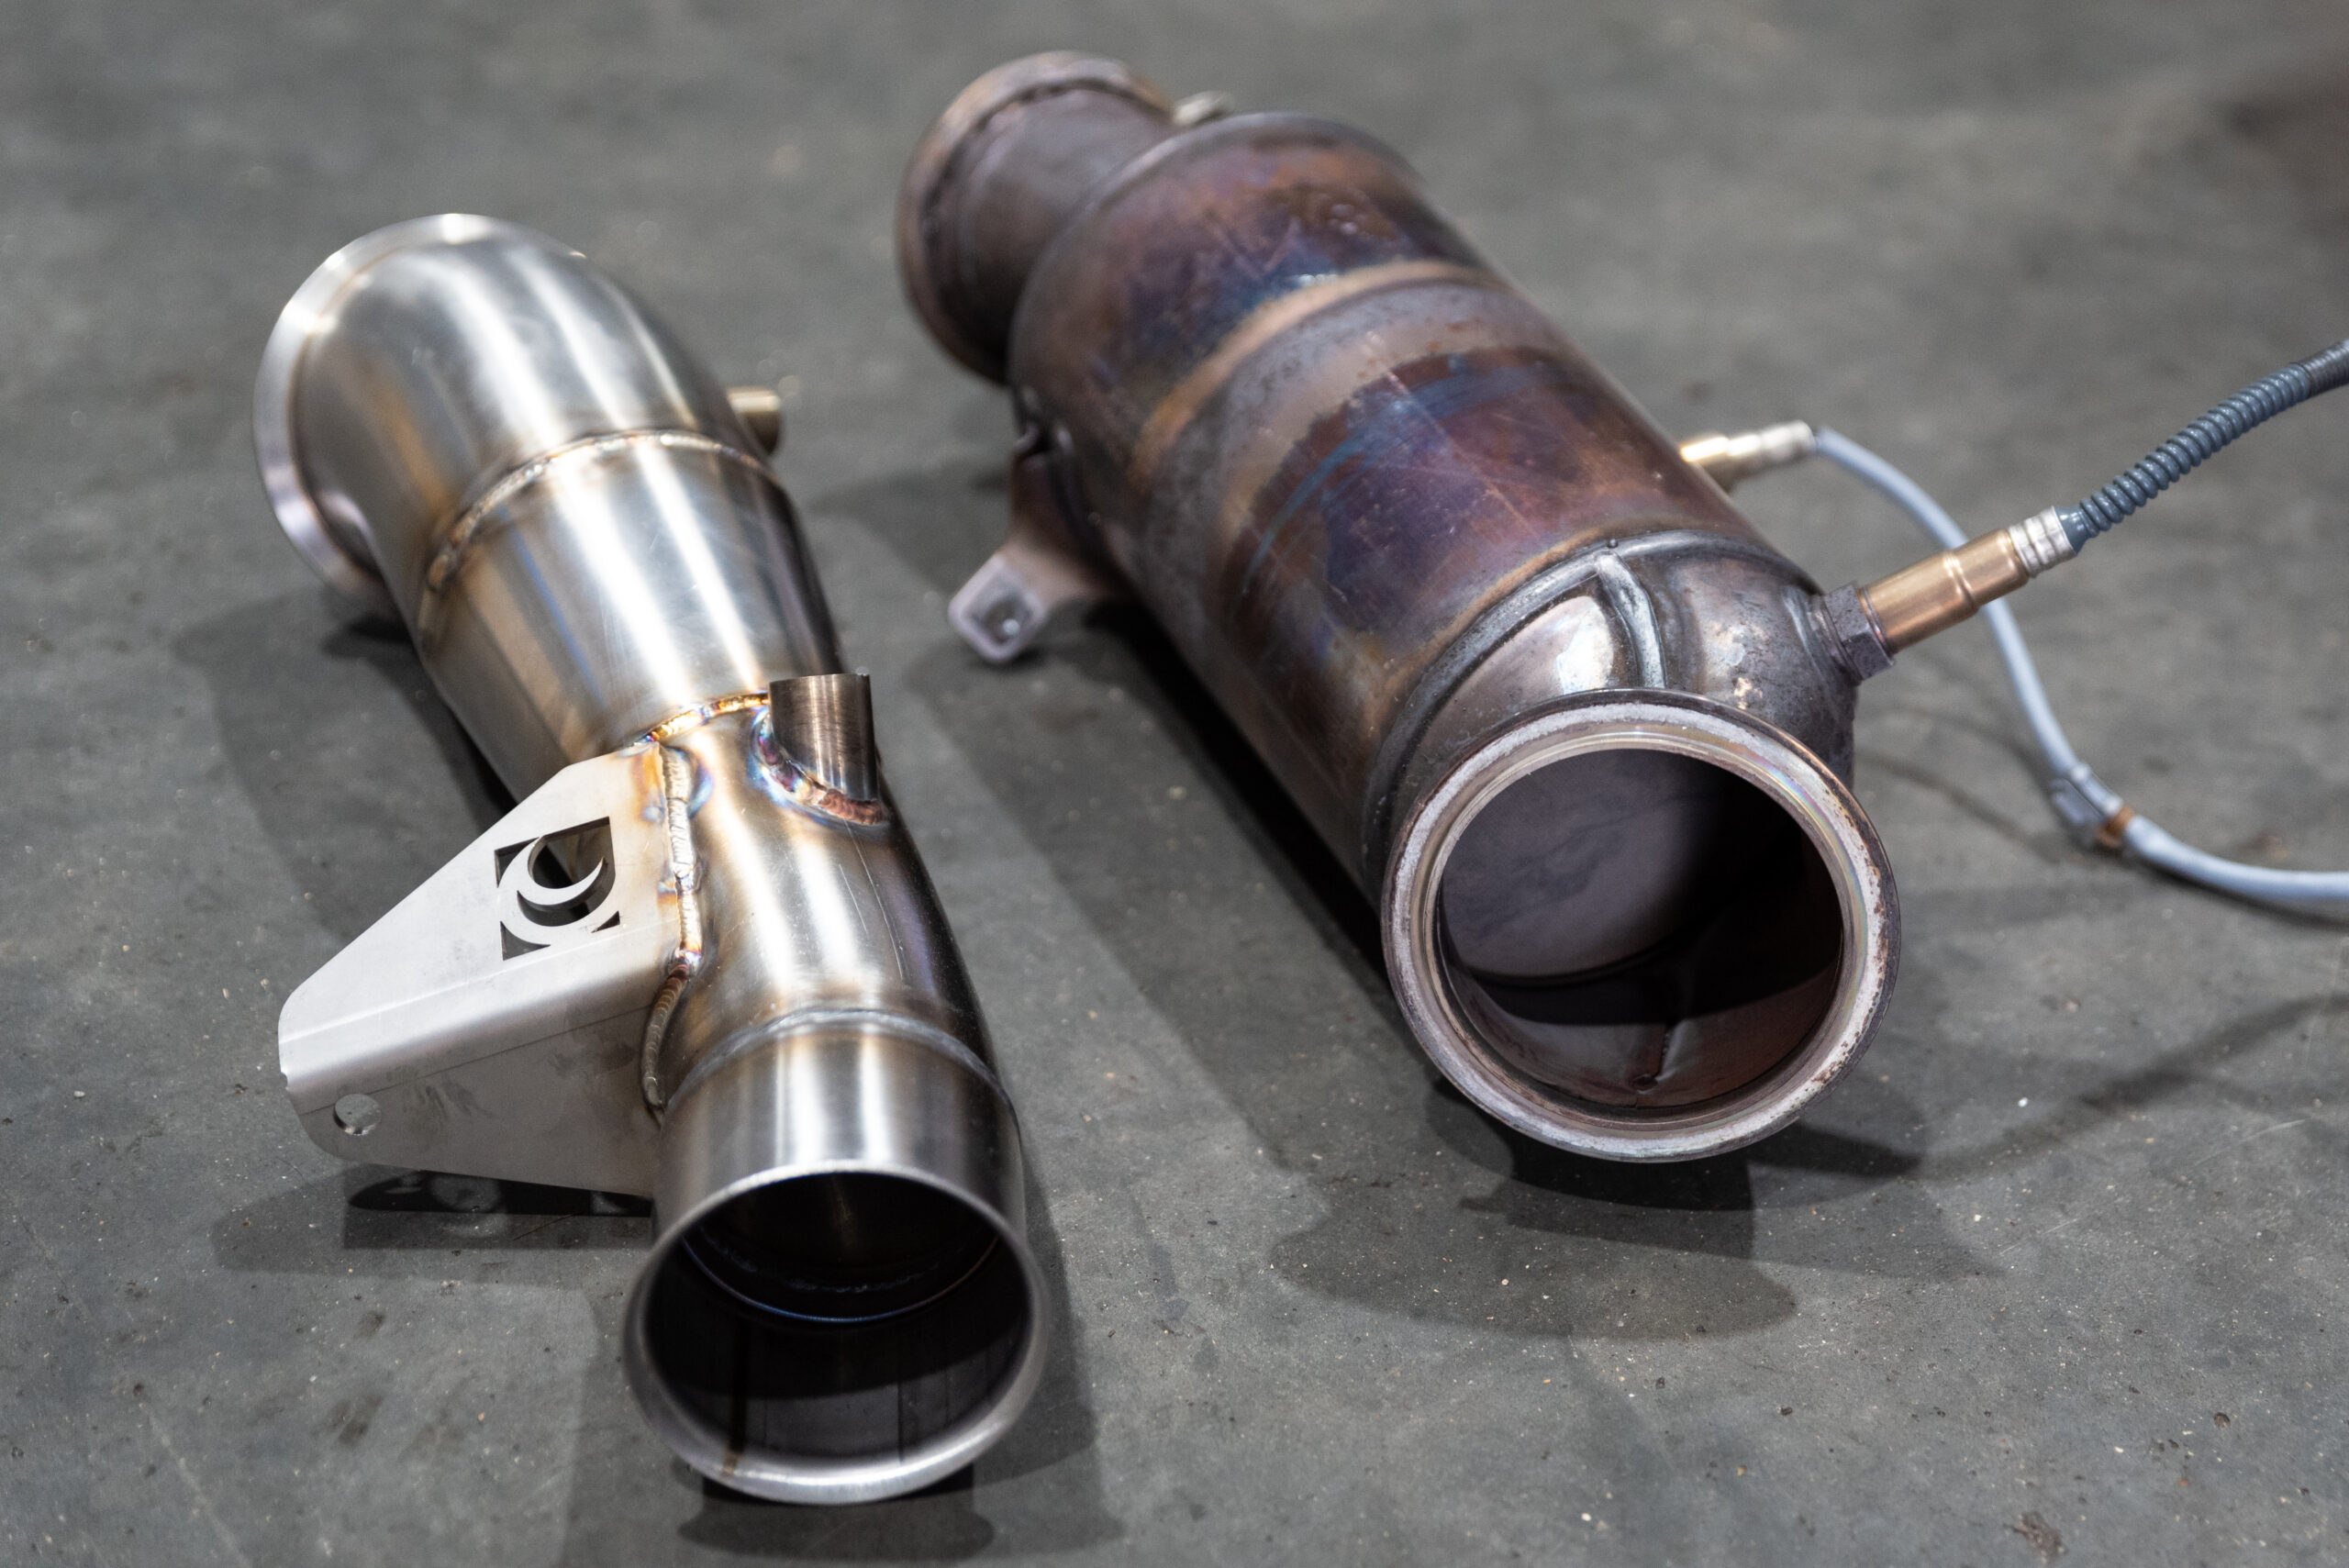
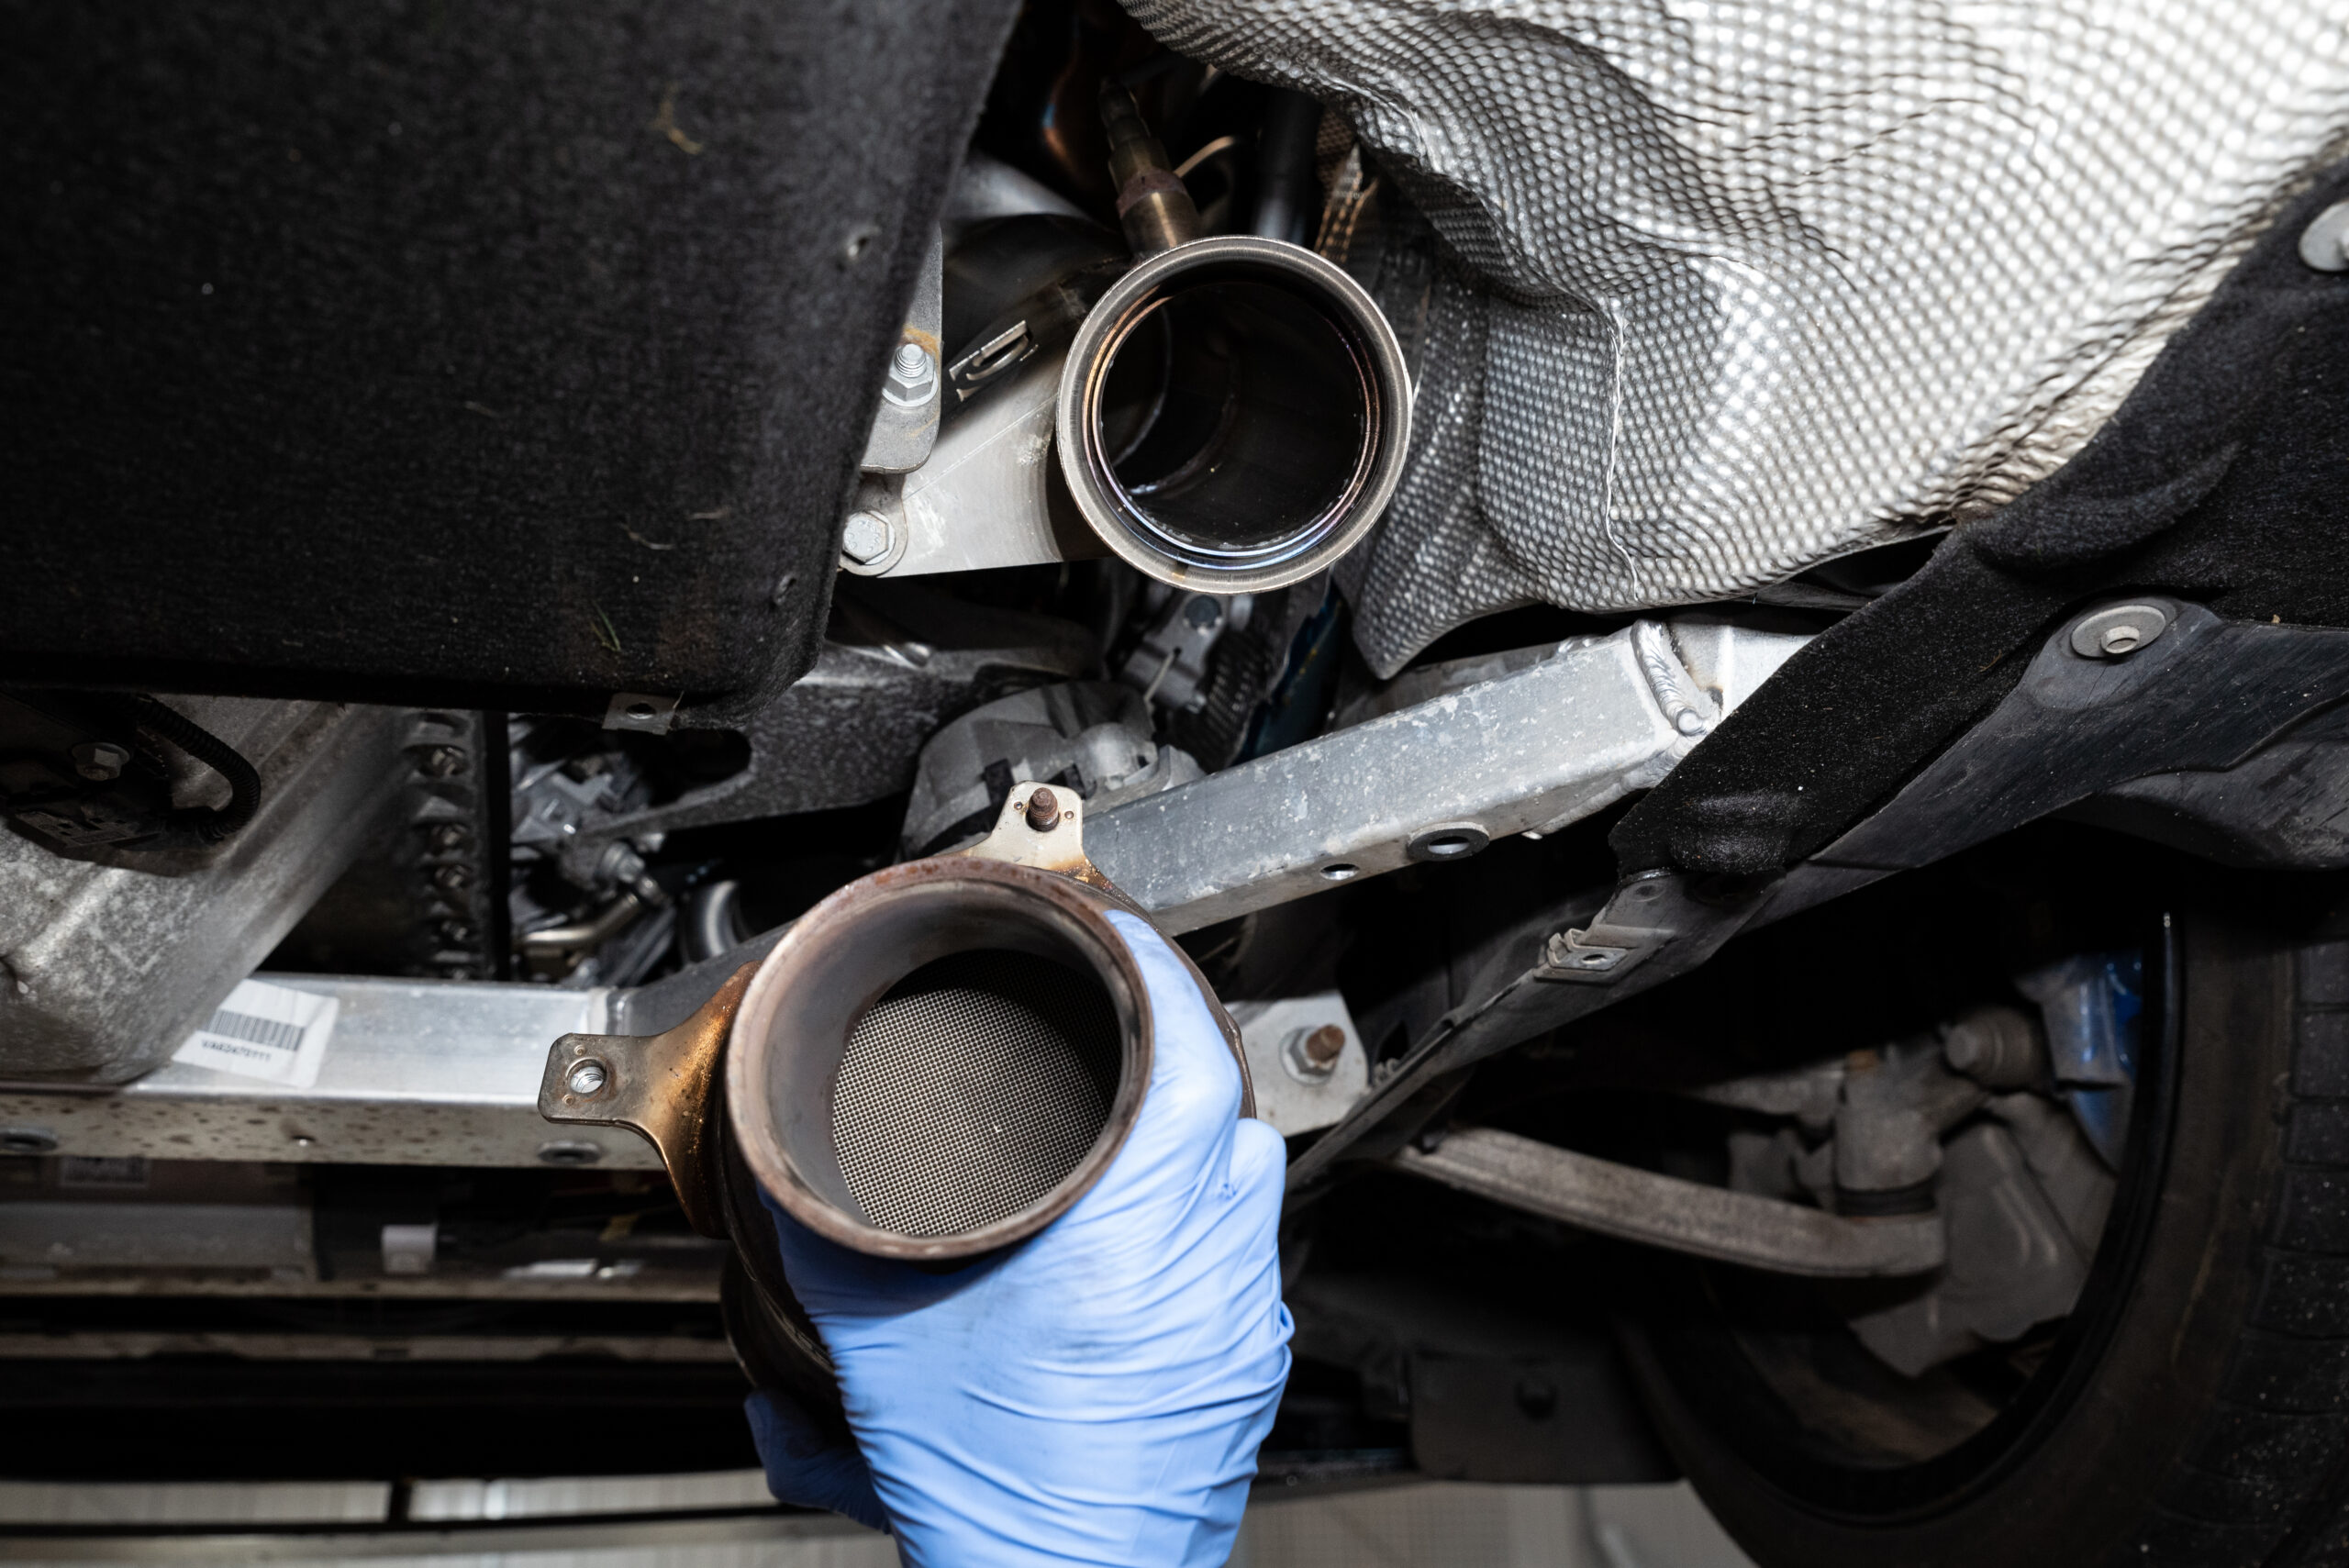
Removing exhaust restriction is the first hardware change for the B16LER Engine. The main (Primary) catalyst is what creates the biggest restriction for the turbocharger. Removing this restriction allows the exhaust gases to escape quicker and reduces exhaust gas temperatures (EGT’s). We replace this with a 3″ decat downpipe, allowing much quicker turbo spool, and therefore more power and torque, along with improved exhaust note.
The next obstruction came from the intake, whereby the standard 70mm MAF housing was unable to read correctly above an airflow of approximately 220HP. In order to allow the ECU to function as it was intended, a larger diameter pipework was required. We have addressed this with a 80mm induction kit, with built in MAF boss to slot the standard sensor into. Once MAF calibration was completed, the ECU was able to correctly meter air mass past the 220HP allowing us to be able to continue with our stage 2 upgrades.
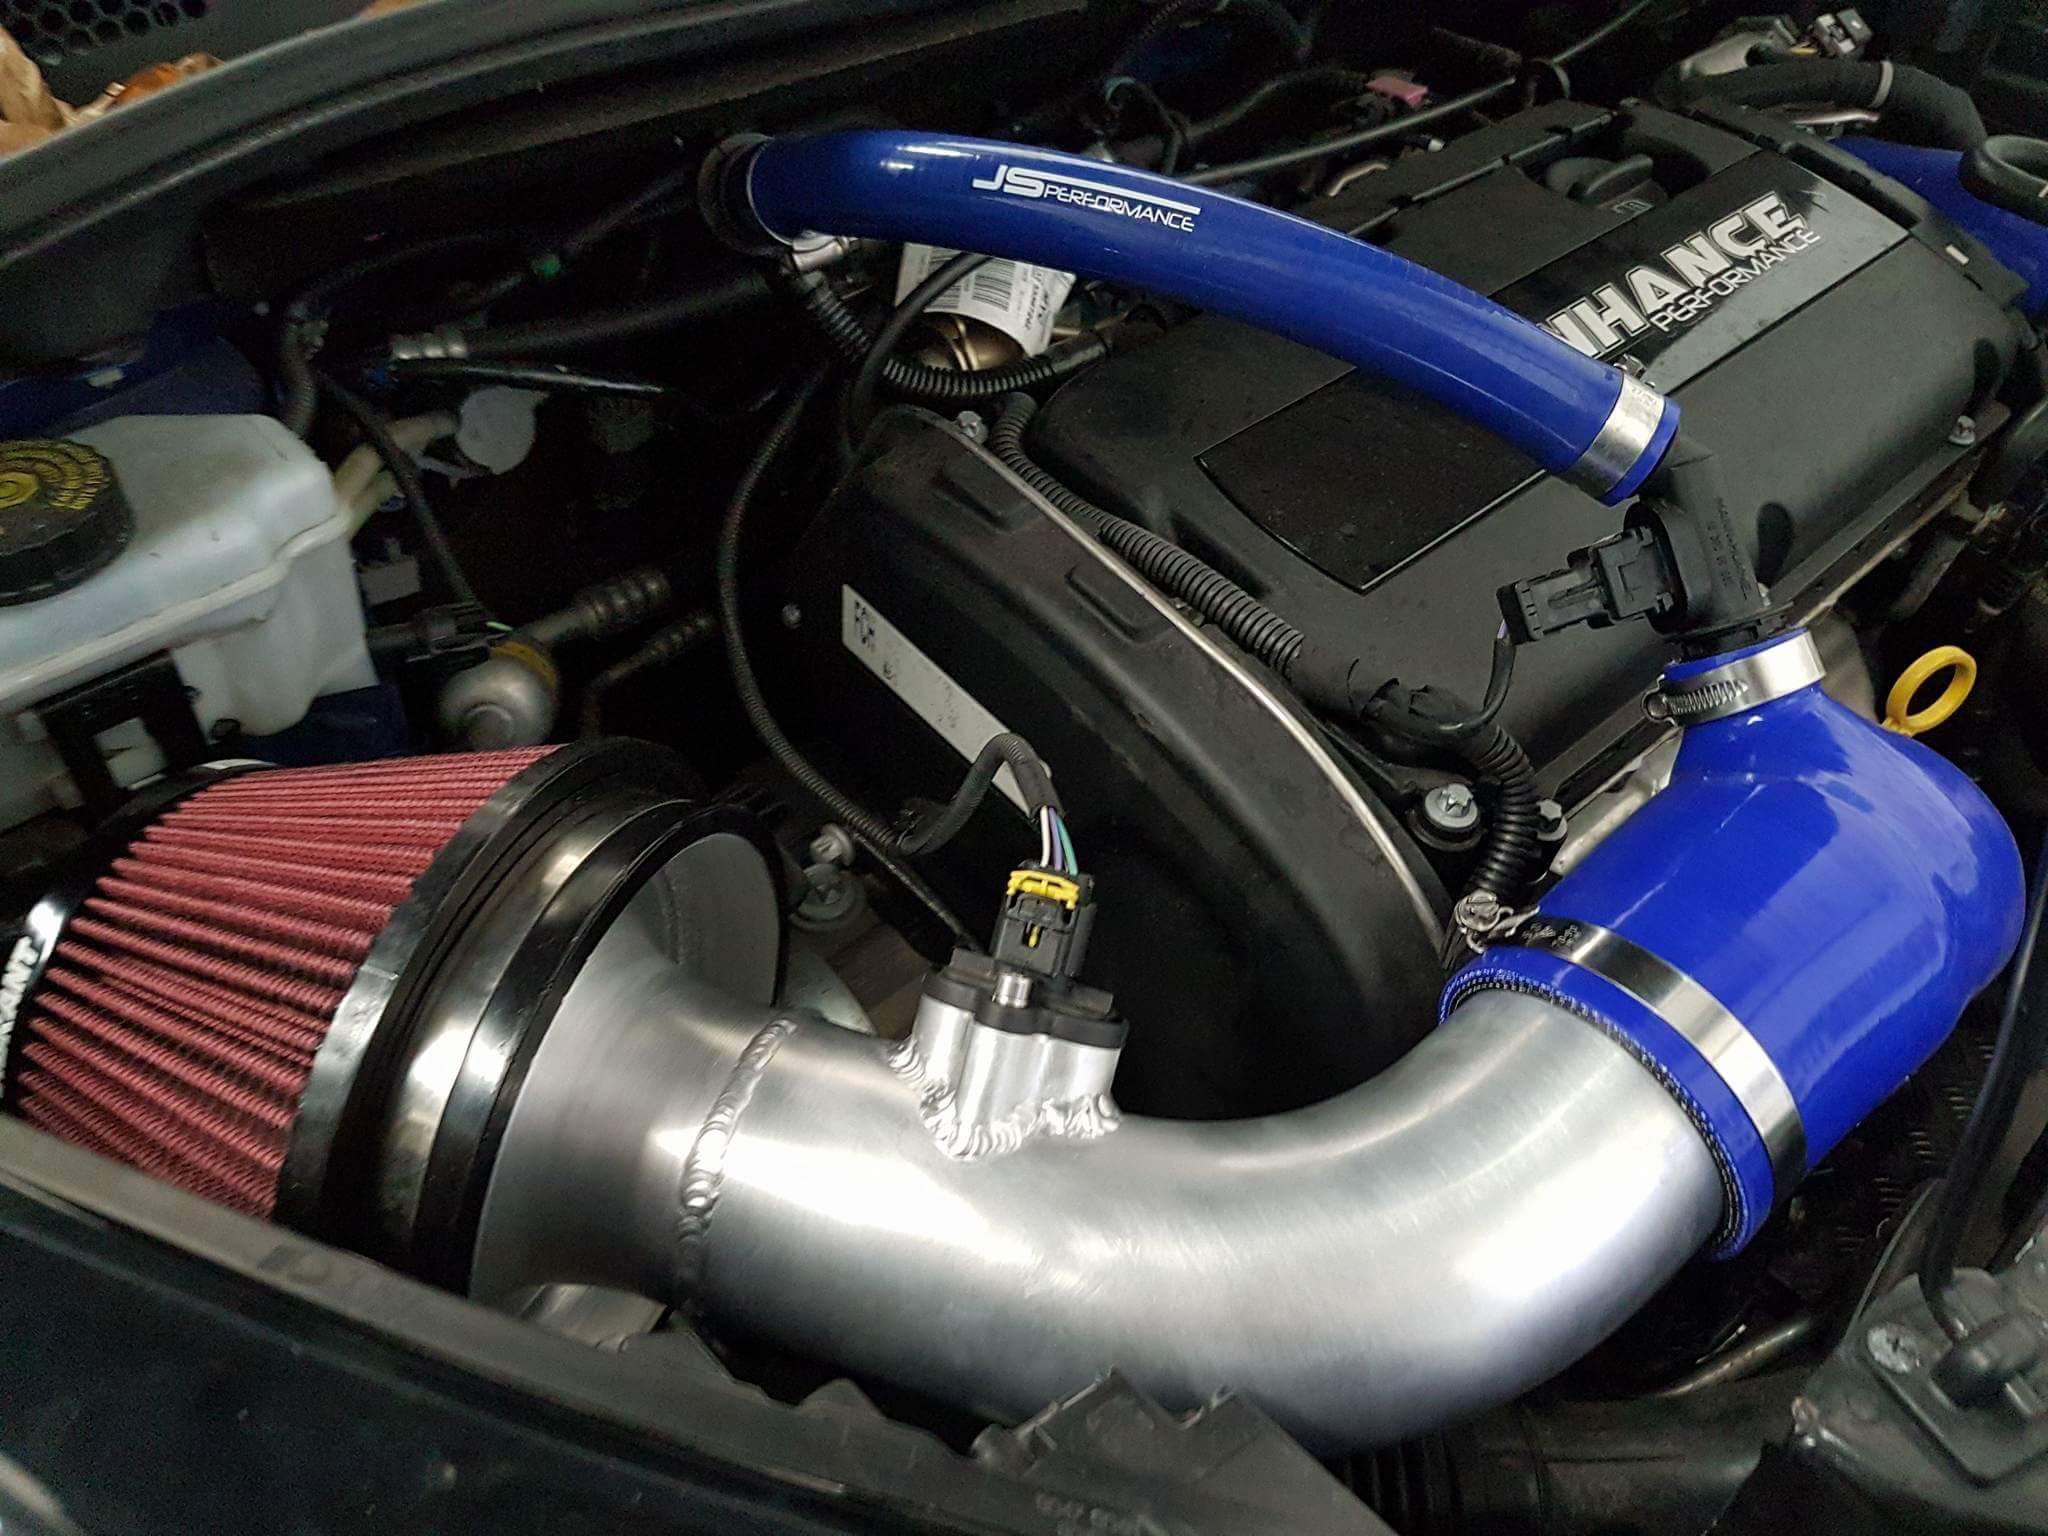
Changing from the factory airbox to the open cone filter induction system saw a massive increase in torque across the whole rev range. 20-30LTBT. With no increase in boost pressure, creating 270LBFT peak torque. This was turned down to a safer figure by lowering the boost pressure – the higher torque option is available only for engines with Forged Internals.
The stage 2 package all comes together with Rabbid Remaps ECU Software, including MAF calibration and optimising Ignition, boost and AFR to create 230-245HP / 240-250TQ Limited (Hi Torque 260-270TQ)
- For those who are after an even louder Exhaust roar, Middle box delete sections are also offered – although power gains are minimal
- Decat downpipe is sold for Not For Road Use, we can however offer a secondary system with a Sport catalyst to remain MOT Legal
WGM Stage 3
The next limitation is intake temperatures- one of the key factors when it comes to consistency. Constant prolonged hard usage and summer months produced what we deem to be very high intake temperatures, which create higher power losses and higher exhaust gas temperatures (EGT’s). During our testing we saw as high as 70+ degrees on the dyno on the factor map! (33 degree dyno room)
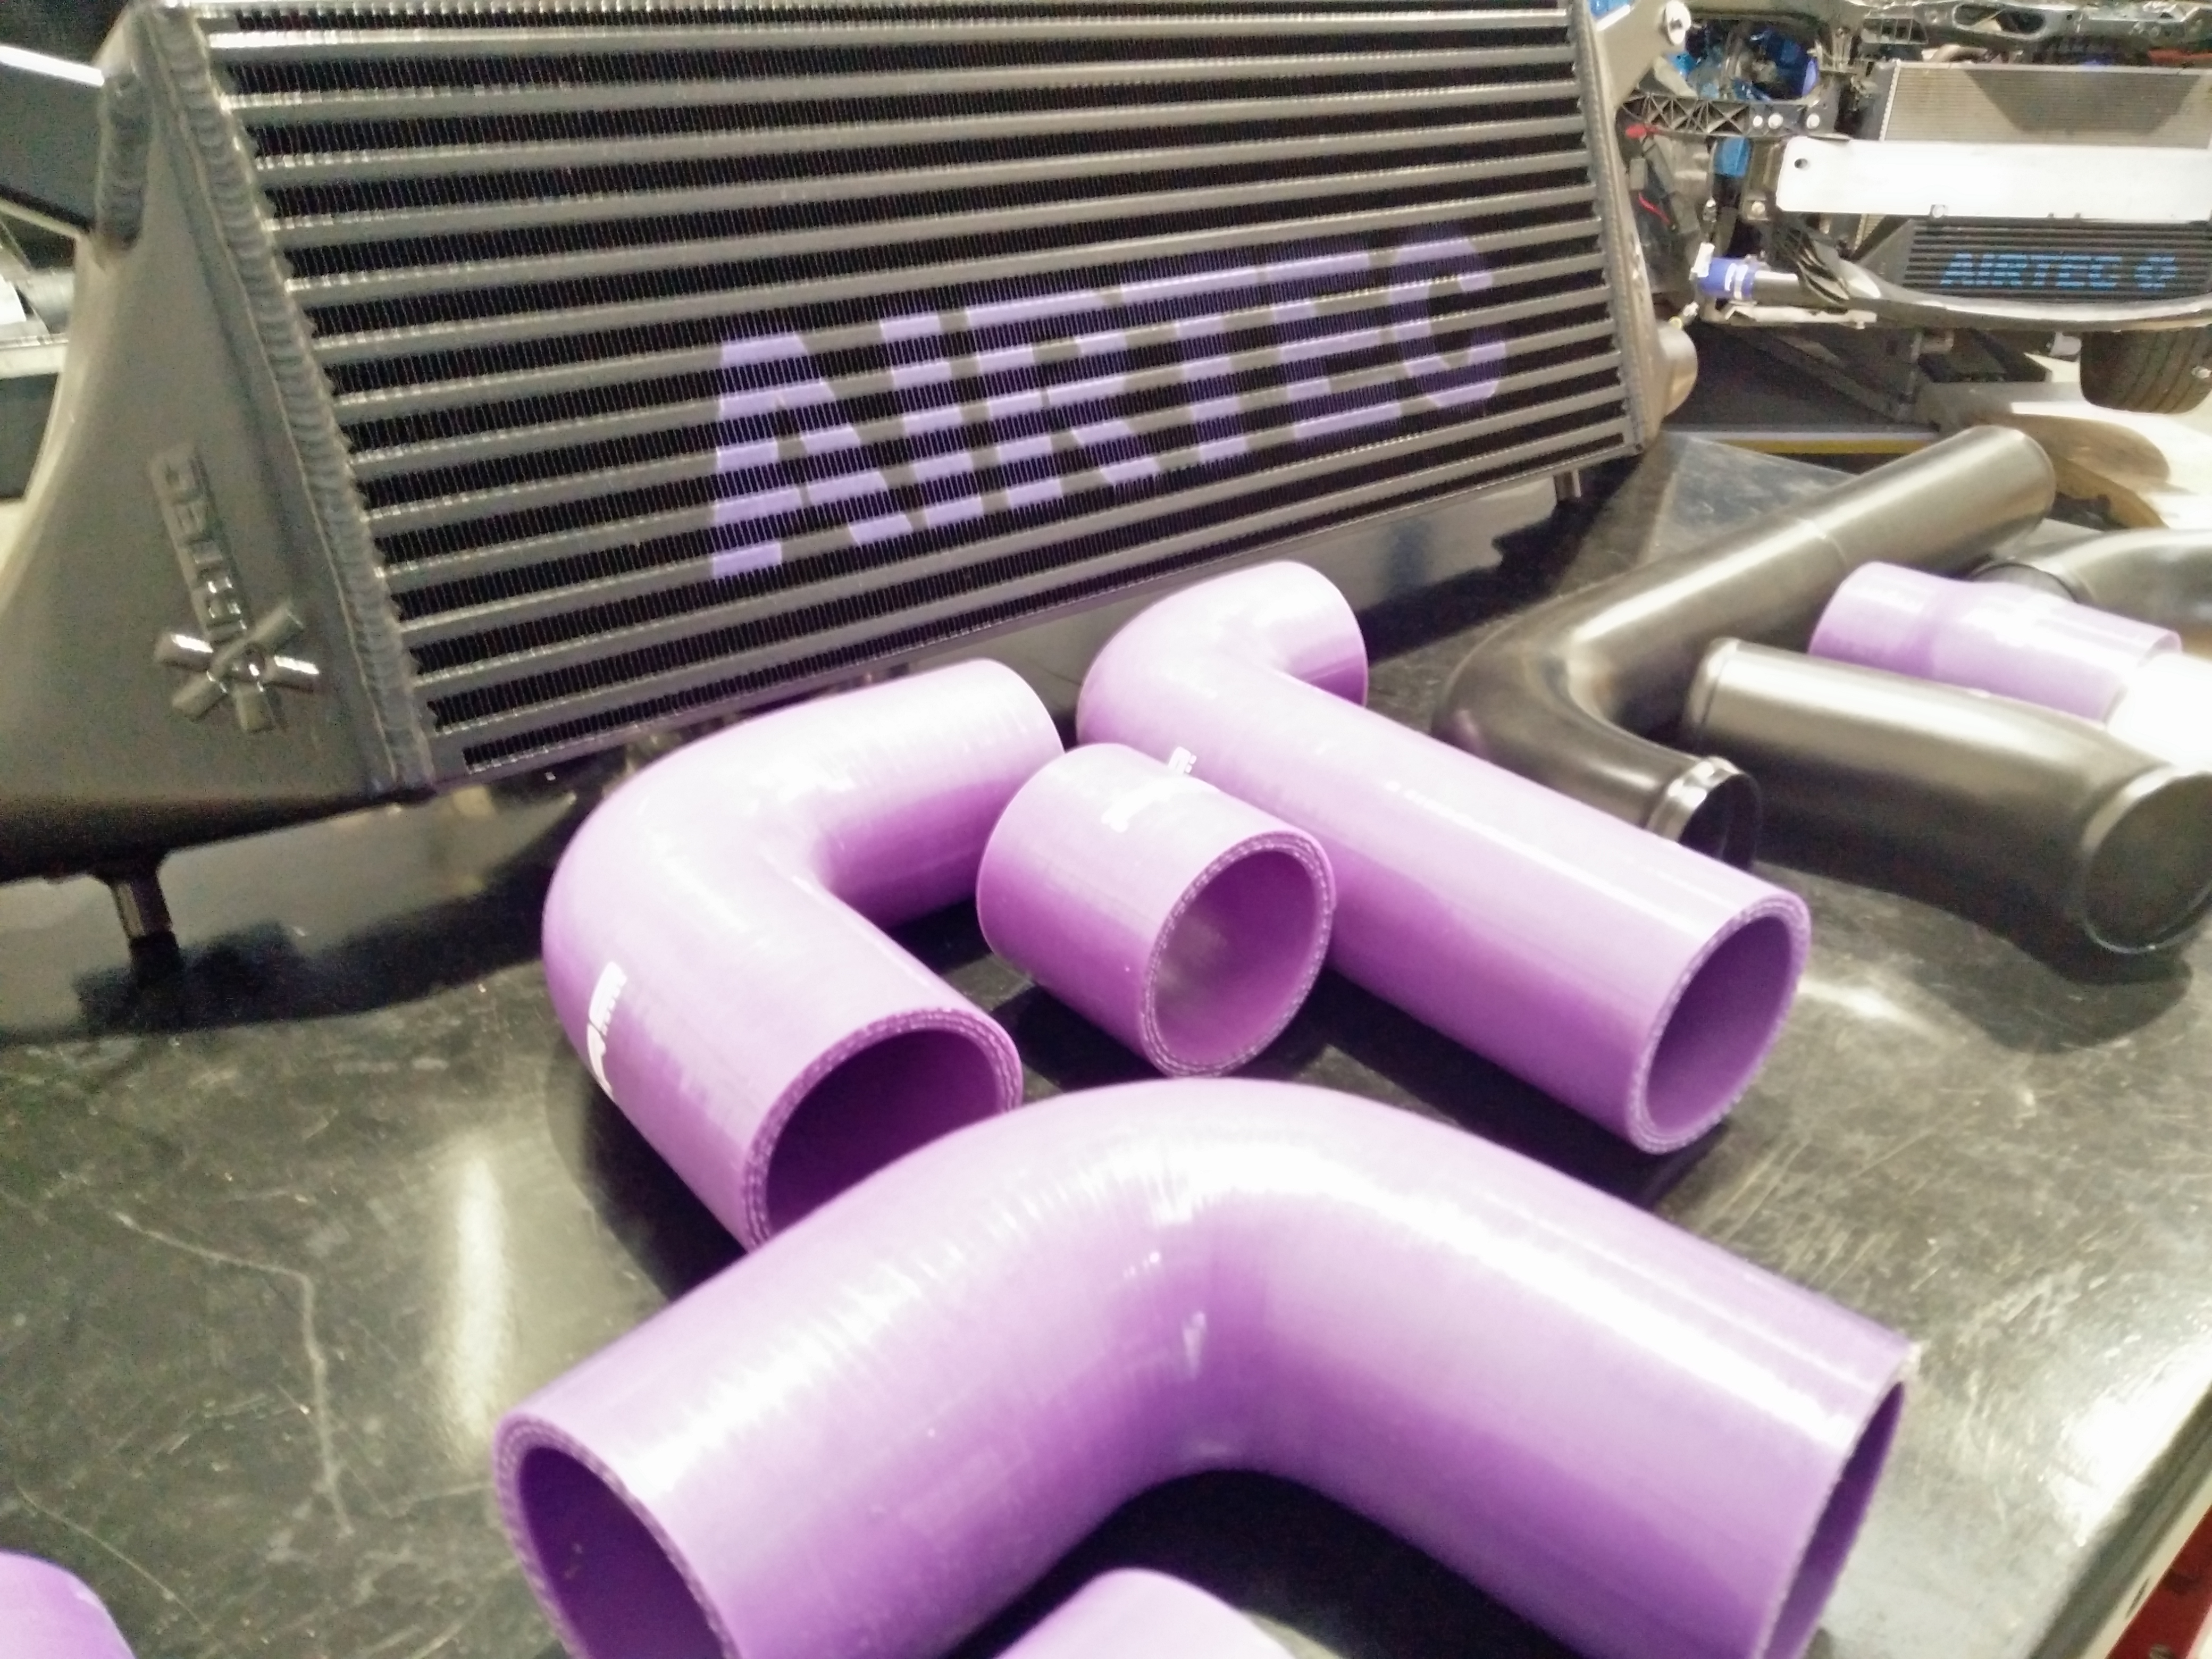
Intake temperatures dropped by as much as 35 degrees with our R&D intercooler from Airtec Cooling Solutions. We were very impressed with the results the intercooler produced dyno, and it was even better on the road, whereby even on a top-speed run, the intake temperatures did not go over 40 degrees on peak summer day.
With the Airtec intercooler installed, the air charge entering the engine is cooler and more dense, therefore the ignition timing and boost are optimized, which leads to a more consistent 240-255HP / 245-255TQ Limited (Hi Torque 270-290LBFT)
- Full turboback system required for optimal results
WGM Stage 4
The standard Ko3 turbocharger is pushed to its limit at around 250HP, therefor the next logical step is to install a hybrid turbocharger. This upgrade takes the standard Borg Warner turbocharger and the Ko4 exhaust wheel from its big brother (the Astra J VXR), along with larger billet compressor wheel machined and profiled by Turbo Dynamics.
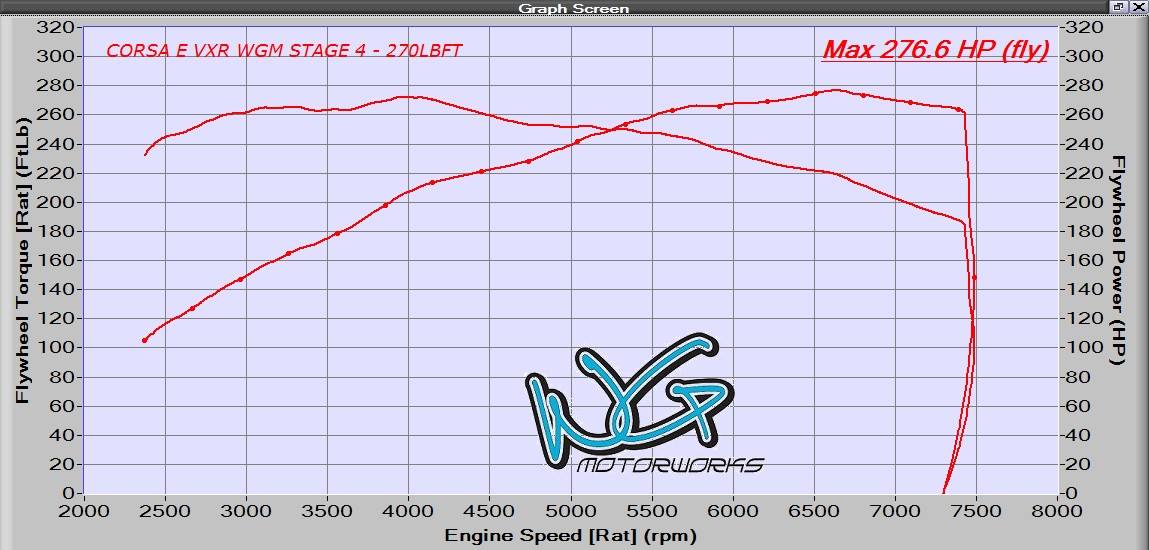
This Turbo set up matched with stage 3 hardware plus ECU Calibration to suit increases the power to approximately 260-280HP with upto 280LBFT
- For Optimal Results full Turboback System Required
WGM Stage 4+
As the standard camshafts are very restrictive on the 1.6 Turbo engines, designed for low down performance and economy. Installing our own WGM fast road spec camshafts, made by Piper Camshafts allows the engine to increase air cylinder fill by increasing valve lift and duration , dramatically changing the flow characteristics of the Engine.
Before the power can be increased any further larger fuel injectors are required to be installed, with injector duty limit nearing the max safe limit at stage 4. Installing the direct fit Bosch injectors now allow enough fueling scope for approximately 450HP.
With Camshafts installed, for the ECU Calibration the idle speed is increased for smoothness, along with higher rev limiter to allows maximum power gains of 290-310HP with upto 300LBFT
- For Optimal Results full Turboback System Required
- Uprated valve springs highly recommended
WGM Stage 5
Our stage 5 packages are well known for pushing the limits of the these small cubic capacity (CC) engines, with new turbo kits currently under development. We will be offering motorsport turbos with beautiful tubular manifolds. Additionally, supporting modifications also already avaible, such as : Uprated clutch/flywheel packages; uprated engine mounts; limited slip diffs; camshafts; valve springs; valves and oil coolers.
The Sky then really becomes the limit!
With this in mind, we intend to keep the packages simple. We will be offering 350, 400 and 450 bolt-on turbo kit options utilising the Borg Warner EFR 6258, 6758 and 7163 turbochargers in a T4 twinscroll fitment for minimal turbo lag.
WGM Level Packages info-
– All power / torque gains can very car to car, therfore the above is an approximate guide of what would would expect +/-5
– To optimal results, we recommend filling up with Tesco 99 or Shell Nitro- any other ‘Super unleaded’ fuel could lead to lower then expected results
– 95 RON/supermarket fuel should never be used, even on a standard factory map
– We recommend forging engine internals prior to tuning, although this is not mandatory
– With standard internals, torque is limited to around 240-260TQ
– Although peak torque gains will be limited, overall ‘uder curve’ torque will increase, making a ‘flatter’ torque curve
– Our software can be customised to your specific car for optimal gains
– Stage packages do not require step by step tuning, you can go straight to the package that suits power / budget
– For returning customers who wish to upgrade to the next stage, please contact for upgrade pricing
Rabbid Remaps explains why we do it the way we do!
So over the last couple years I’ve been working for myself providing bespoke remaps and providing services to WG Motorworks and I’ve probably seen every mod on the market for the VXR and between Warren and myself we’ve cherry picked what we have found works well. I’ve seen many people bolt on any old bit and sometimes feel down that the car didn’t achieve good results.
So I thought id share a couple of cars with you all and say a bit about what we believe makes the cars work so well and why, and how to build yourself an absolute monster of a car.
Big Power Astras
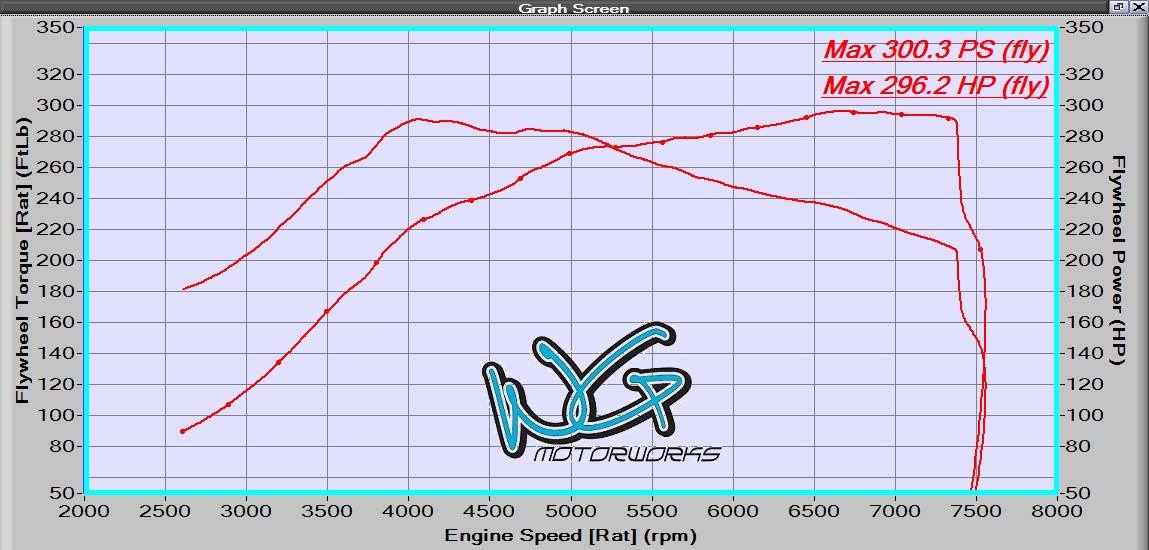
One of the first customers I had was local member Charlie G, his car started off with a few mods on and got in touch originally regarding cruise control. We talked and he agreed to help me develop some of my original base maps. At Stage 3 we achieved 296bhp, rolled at Surrey Rolling Road which is Dyno Dynamics, a good stage 3 typically comes in around 285-290 on one of these machines.
Today his car has had a couple more bits chucked on and a bit more tinkering with the map and rolled 481bhp on Hampshire Rolling Road which is also an analog Dyno Dynamics. This is with a mere 24 psi of boost.
I have to admit that Charlies build is one of the tidiest ones I’ve seen, he’s put a lot of time and money into it but more importantly a lot of time and effort to do things right and the hard work really paid off.
http://www.youtube.com/watch?v=KCqzO8cfgQ0
The key spec points with this car:
- Z20LEH with forged rods and valve springs
- Nortech Turbo kit with Garrett GTX3071R turbocharger
- WGM Fast Road spec camshafts manufactured by Piper cams
- Airtec Intercooler, Scorpion Exhaust, Pipercross cone
- 90MM MAF with 875cc Siemens Deka IV injectors, Aeromotive Pump
Adam is a customer of WG Motorworks who tasked Warren with fitting his Garrett conversion, Adam was alot more concerned about reliability so we kept the boost down at a mere 1.3 bar or 19/20psi, but despite this we were still able to get just shy of 450bhp from the car.
http://www.youtube.com/watch?v=peG9Q_aMR1o
- Z20LEH with forged rods and valve springs
- Nortech Turbo kit with Garrett GT3076R turbocharger external screamer
- Uprated cam shafts
- Airtec Intercooler, Scorpion Exhaust
- 90MM MAF with 875cc Siemens Deka IV injectors, Aeromotive Pump
Both the cars above could easily crack 500, don’t be surprised if Charlie’s ends up with another 1psi within next few weeks and does so. Adams has even more chance with a slightly bigger a turbo on it to do so also at similar boost levels to Charlie he would probably see 500.
Big Power Corsas
Most of you probably have seen Adam and Jon’s Corsas before, but there are several more on their way to the road in the next few months, 2 or 3 hopefully within the next 4-6 weeks, with plenty more planned.
http://www.youtube.com/watch?v=fADId8OLrGw
- Z16LER with forged internals and valve springs
- Nortech Turbo kit with Garrett GTX2867R turbocharger
- Uprated cam shafts
- Airtec Intercooler, Full Exhaust
- 90MM MAF with 630cc Bosch injectors, Aeromotive Pump
Jon’s was our original 400+ Corsa VXR, while a very capable car some changes in the approach were made with Adams proving a higher compression engine could work to make more power with less boost.
With more cars on the way we have even more improvements to the specifications of the pistons and cams as well as some customers going for slightly smaller and much larger turbos.
How to Build One of These Cars
Astra engine builds:
In terms of the engine builds we’ve been recommending to use standard pistons. Reasons being not only are they up to the job in terms of strength but they perform better than many lower compression pistons on the market. Maintaining a higher compression makes more power natually, but lower compression actually leads to more detonation. If you have to lower timing to prevent detonation you’re losing even more power.
They’ve been proven in Klasens 700hp vx220 and in time attack by Bo.
Corsa engine builds:
Corsa VXR engines despite being a pretty infamous engine for piston 4 issues, once forged with valve springs are absolutely aweseome engines. Raising the compression up from the standard pistons and then adding a decent set of cams to complement the forged internals will lead to an engine capable of delivering huge power and high reving all the way up into 8500rpm perhaps even beyond.
These engines dont easily suffer from detonation issues and can easily run far more ignition than the astras, meaning they’re able to be much more efficient and can actually produce more power from the same sized turbo than if it were fitted to a Z20LEH. Even with boost turbos higher compression works well. I see no reason to fit anything less than standard compression on these cars.
Adams at high compression can make as much power running 1.7 bar 25psi of boost than a low compression car running over 2.2 bar or 32/34psi of boost.
Fabricating the bits:
When it comes to fabricating Nortech are well known for providing high quality manifold kits to numerous cars and the quality speaks for itself. Everything from the quality of the material to the construction and welding. You can rely that these manifolds are unlikely to crack, and fit well as expected saving time and hassle.
Cam specification:
While they’re piper cams they’re not your typical off the shelf product. WGM specs have been tested and refined for different applications. Many people only sell one cam, but just like the stock cam, one cam doesn’t fit all situations. WG Motorworks can supply several cam specifications depending on the requirements. Charlie’s car uses the milder specification which idles nearly as well as standard and maintains the low end drivability which is lost with more aggressive specification cams, yet still can deliver awesome amounts of power. Considering this car puts out 480bhp with a mere 24psi, it shows going OTT with cams isn’t always required.
Cooling:
Cooling, one of the biggest problems for the Astra is detonation caused by high intake temperatures, many normal coolers on the market struggle to handle large power but the Airtec continues to amaze me compared to other coolers of a similar form factor. It’s much more about whats inside an intercooler than the size.
Even pushing 480hp it still maintains amazingly low intake temperatures within 15-20c of air filter temperatures meaning denser air charges and less induced detonation. Only this afternoon I had higher intake temps of a low boost Garrett at only 15 psi running another similar sized cooler pulling intakes easily over 30 degrees above air filter temperature and only producing around the 340bhp mark.
Fuel Injection Systems:
Finally electronics, to make this all work. To get the car to work right you need to be able to know whats going on. To properly run over 400hp you need a MAF that can read all the air coming into the engine. The stock Astra VXR 80mm MAF becomes over welmed at around 380hp and starts to lose resolution and clips.
The MAP sensor on the VXR is primarily used for boost regulation so the car can double check the boost levels it is running, this allows the car to adjust the boost and turbo in real time. However there is a problem, the stock ECU can only measure just shy of 22psi. So you need to switch to an openloop locked method to control boost and take the adjustment away from the ECU. Even running a 3 or 4 bar map sensor on an Astra H or Corsa D doesn’t help you as the internal memory and maths used in the ECU only understands numbers up to 22psi.
Injectors, you need suitable injectors for the job, Astra 630cc are suitable until around 420bhp and 875cc will take you right up until about 530bhp. Corsas being more efficient can run about 450-470bhp from 630cc’s with larger injectors such as 750cc or 870cc available to push even higher.
If mapped properly you should have no issues with emissions testing and very very minimal loses in economy. We use the stock regulator, it has proved perfectly fine and as we have no need to change fuel pressure it is fine as it is. The Aeromotive internal fuel pump has proven perfectly fine for these applications without the need to install external tanks.
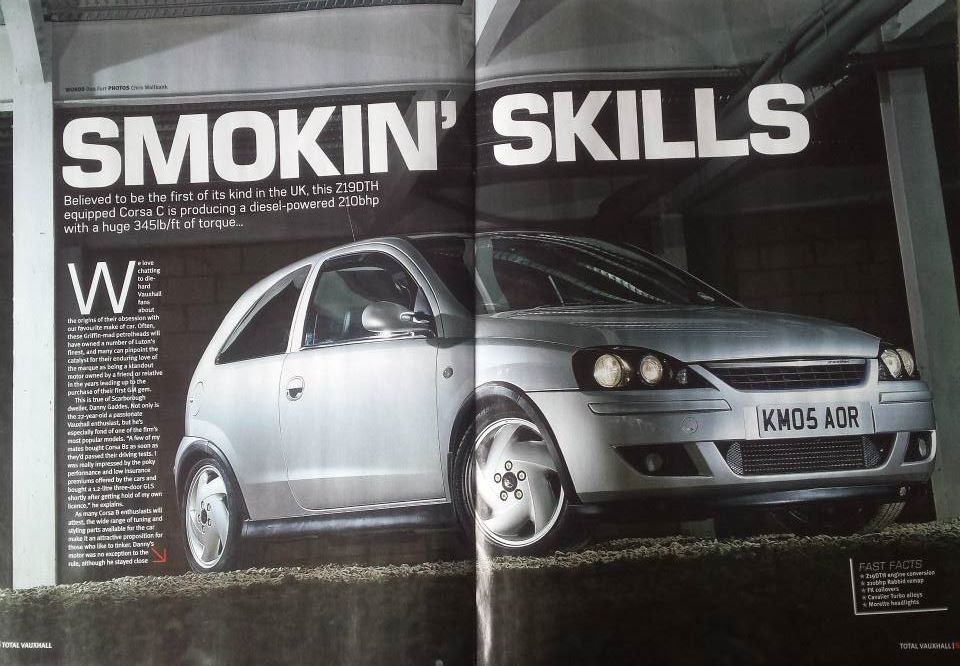
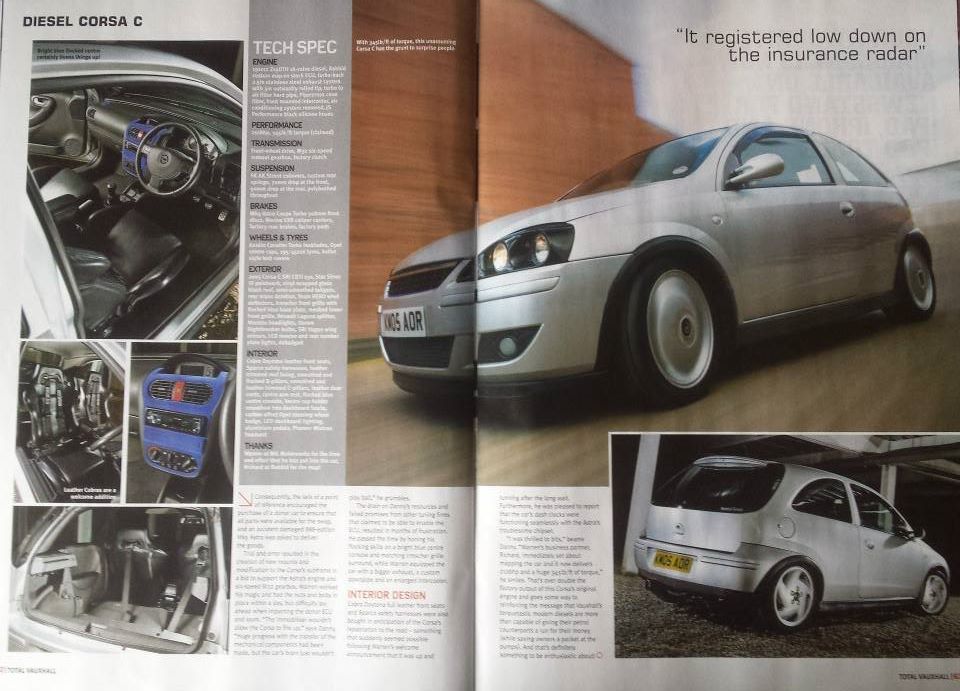
Corsa C 1.9 CDTi Z19DTH
WGMotorworks Corsa C Z19DTH Conversion
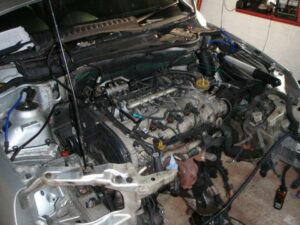
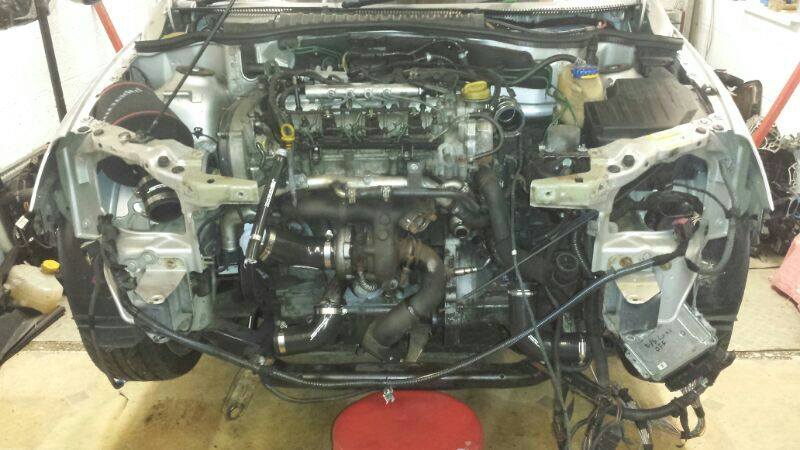
We were given the task for converting Danny’s 1.7 CDTi Corsa C to a 1.9 CDTi, A Conversion that had never been carried out before (as far we were aware)
The 1.9 CDTi engine is found across the Vauxhall range, but not in the Corsa C unfortunately, and has proven very punchy motor with wide spread of power and torque – even when standard
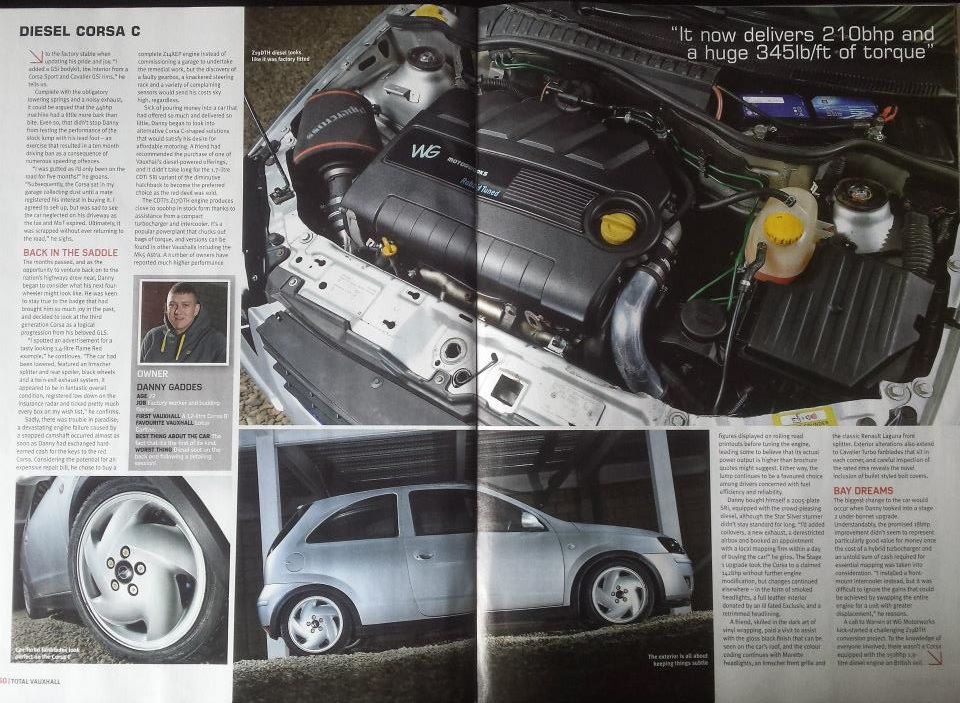
Even before we started the conversion, we knew it was was never going to an easy challenge, but never the less – we took on the challenge!
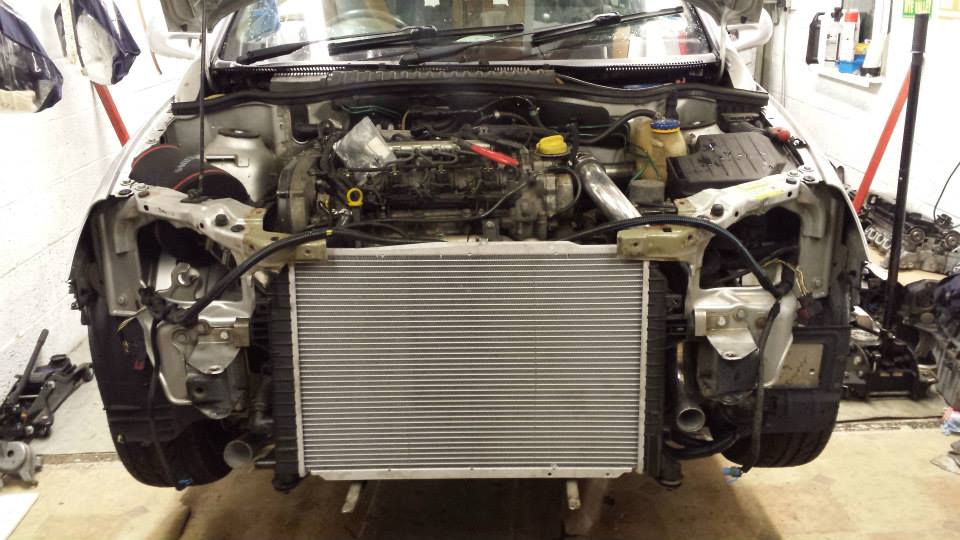
The Engine was removed and mounted into the Corsa in a couple of days – and amazingly everything fitted perfectly! All that had to be done was remove the Aircon Pump (as would foul the subframe)
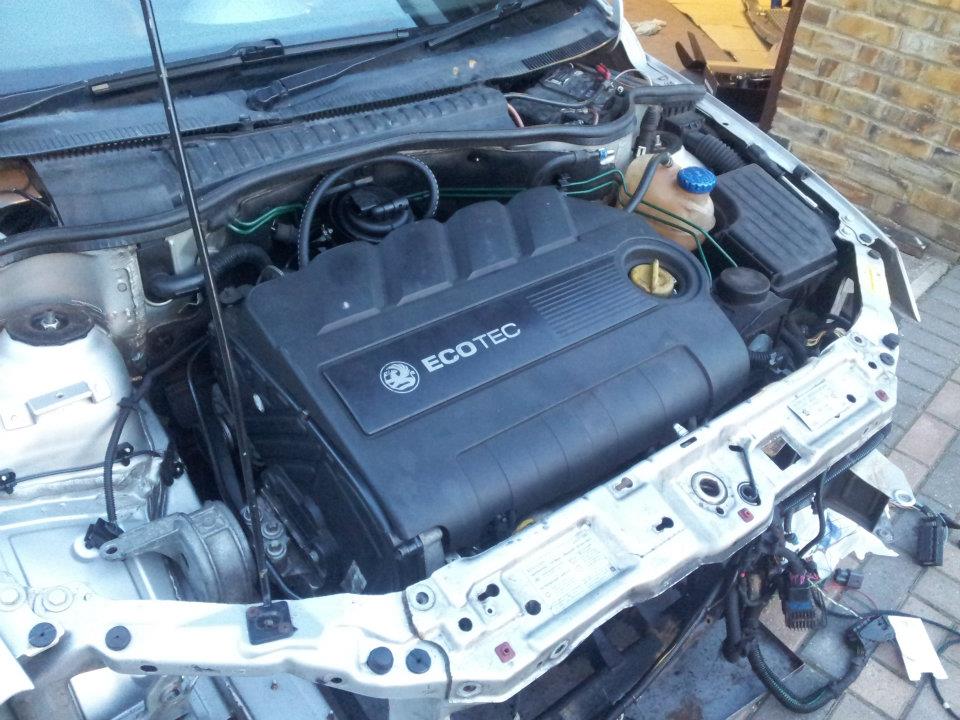
Once the easy part of mounting the Engine and 6 speed M32 Gearbox into the Corsa – getting the ECU to talk to Tech 2 was the next job, with a few hours comparing wiring diagrams and converting the 1.7 Loom over to run the 1.9 ECU, we had communication with the Bosch EDC16 ECU
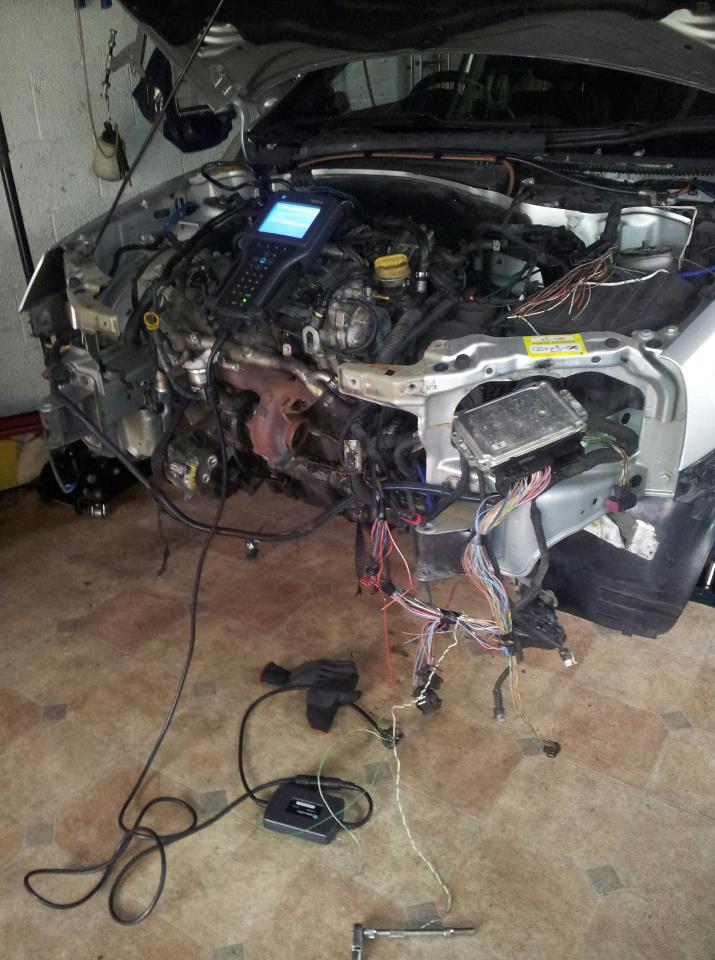 There were several issues along the way, which delayed time – But after failing companies attempted to carry out ECU work, we had to find another way, though it proved baffling at first, but with many hours staring at wiring diagrams and alot of head scratching! But we got there in the end, while this was being carried out the conversion modifications were being carried out
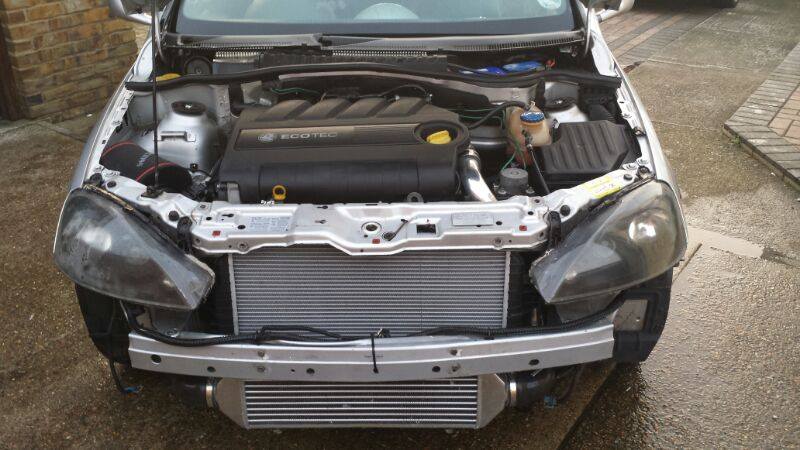
Running Turbo back 2.5″ No (zero) Silencer system, giving this Corsa a distinctive bark – Matched with a WGM Rabbid Remap boasting 210bhp / 345lbft
Proven 1/4 Mile at 14.5 on standard diff!
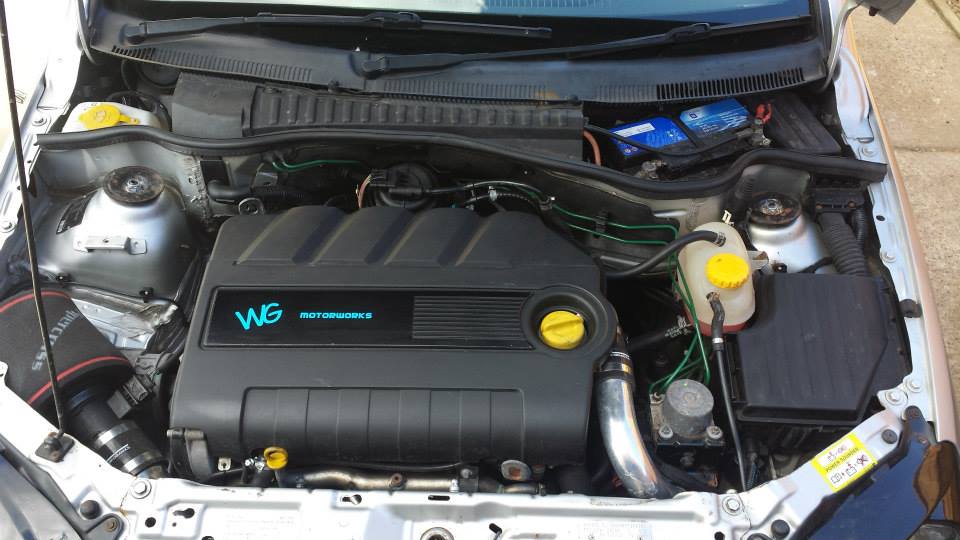
As far as we aware, this is the first Z19DTH converted Corsa C in the world – And will stay that way for a long time
For more pictures: https://www.facebook.com/media/set/?set=a.422653087776613.89947.207028252672432&type=3
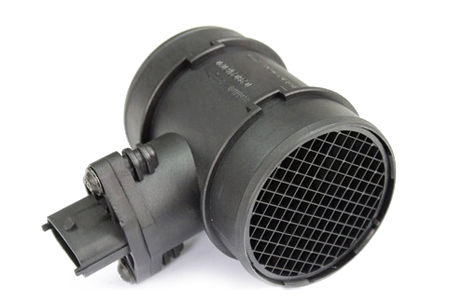
The Importance of The Mass Air Flow Sensor
Many people know the where the mass air flow sensor it, they know it reads mass air flow, but what does this sensor actually do and why is it so critical? It’s a very useful invention, but at the same time it is very sensitive to change, and a faulty or one that is incorrectly setup will cause you issues. Many people do not know, simply fitting an air filter or a different induction kit to a car could be doing much more than they think, improvements felt may not just be the air filter alone, but incorrect and potentially dangerous running of the engine due to MAF errors.
Ever been to a Dyno Day and seen a car running mysteriously lean? In many cases it may just be down to errors in the MAF reading. This article will explain what the sensor does, and why it can make such a huge difference to the running of the car.
Well the job of this sensor is to measure the amount of air mass being digested by the engine. The critical word being air in MASS which is expressed in a mass over time, for example (Kg/Hr) Kilograms per Hour or Grams per Second (g/s).
If you know the mass of the air then you know mass of the fuel you require to add to maintain your desired air fuel ratio. However, if you read this amount of air wrong then you will add the wrong amount of fuel. This will cause an engine to run rich or lean.
Older systems used to work out the air mass mathematically by knowing the size of the engine, the pressure and temperature of the air as well as the amount of oxygen in a typical mass of air. But this required a lot more calculations and a lot more sensors to achieve. The formula used was the ideal gas law which is as follows.
n = PV / RT
n = Air Mass in moles.
P = Absolute Pressure of the air.
T = Absolute Temperature of the air.
V = The volume or size of the space you’re putting the air in.
R = The gas constant for atmospheric air.
If you changed anything about the car, such as put a different set of cams in or changed your exhaust manifold or anything that might change how the engine breaths all this maths would have been made invalid as not all the air calculated by this formula would make it inside the cylinder and a table known as the Volumetric Efficiency Table would be used which is simply what percentage of the air actually made it all the way into the engines cylinders.
Skip forward to more modern times you’ll find that we’ve developed sensors which can do all of this in one go without the need for any maths, the Mass Air Flow sensor. This works out the exact air mass coming into the engine regardless what conditions, whether it’s a hot day or a cold day, whether you’re up a mountain in low pressure or down at sea level in higher pressure.
The sensor sits in the intake tract just after the air filter and produces a signal from 0V to 5. This works by having a small element of wire which is heated and the atoms hitting it cool it down. The more atoms hit it, the higher the output voltage back to the ECU. If your engines volumetric efficiency changes, then it’s not a problem the additional air mass or reduction in air mass is detected by the sensor and fuel is calculated correctly.
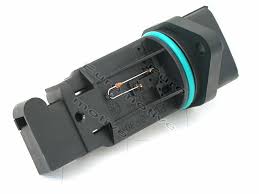
But there is a major catch to the sensor, if you do anything to the position of the sensor in your intake or its surrounding pipe work then you will change the accuracy of the sensor. This is because the sensor is a small element in the middle of the air stream from one edge of the housing to the centre. If the pipe work either side is not perfectly straight but infact curved then more of the air will move around one side than another. For example if you take the Astra VXR cross over it has a 90 degree bend on either side and this bend is taken into account when the original MAF calibration was written. If you take the bends away by fitting a short intake pipe and using a cone or a CDTI box then the calibration will be incorrect. But even just rotating the sensor to a different angle will change how the air flows through the MAF sensor, if it was flowing more to one side it and the sensor was in the main air flow or would then be on the side with a lesser air flow which again would cause it to read wrong and in this case read low and cause lean running.
There is also a limit to how much air the sensor can read before the cooling effect will prevent the wire from heating up at all to get a lower voltage then its maximum 5V output. This is known as clipping where the sensor will report the same air flow even when the cars air flow is increasing beyond this. This is the time where you need to upgrade the MAF sensor to a larger one, by doing so you will have more air missing the sensor and that means the total amount of air flow supported by the sensor before it maxes out is higher.
Here is the calibration curves of various sensors ranging from 70mm, 80mm to 90mm. The power the sensors support range from around 250BHP to 500BHP. The left axis shows the Kg/Hr and the bottom axis shows the voltage output. This calibration curve must be properly inserted in to your ECU map to match the sensor you’re running. Incorrectly doing so is potentially dangerous to your engine, and will cause serious running issues or may even fail to start.
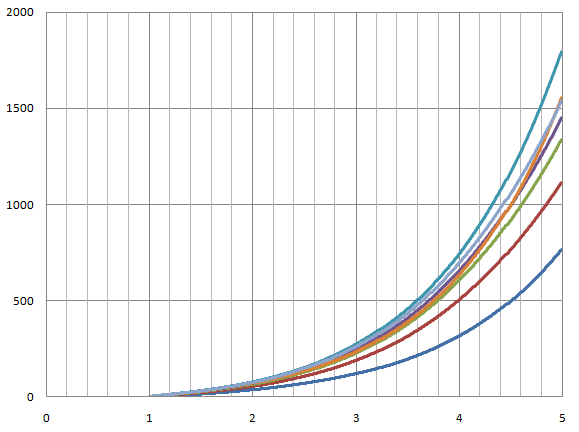
The blue line is an Astra GSi 70mm, the red is the Astra VXR 80mm, and the rest are a number of 90mm MAF solutions available. As you can see despite there being several 90mm options each one has different air flow amounts depending on different intakes used with them. So as you can see, the wrong air mass reading will give the wrong fuel requirement and therefore you could run leaner or richer than the map requires.
By knowing how much air mass a cylinder can hold you can take the total air mass reading, divide it by the number of cylinders and using the engine speed work out how many cylinder fills are happening in a certain time period you can then know how many atoms of air make it into each cylinder this is how you determine how much fuel is needed. But that is just the start, the MAF is also used to determine engine load. If you know how big the cylinder is you can work out how much air the cylinder can hold. If you have an engine at half throttle the cylinder might be getting 40% of the maximum air it could take. This is 40% load. If you then went full throttle you will find the cylinder load will go up to around 90-105% depending on the engines efficiency. But if you then add a turbo you might find you’re forcing way more air in then could naturally occur. At low boost you might say this is 130% load, or and higher boost perhaps 180% load. A typical Astra VXR stage map will fill the cylinder at around 170-200% depending on the boost levels.
But why is this load important? Because so many other ECU functions are using this load amount of pick up how they will run. Everything from spark advance, to the boost required, to the traction control system will use this load value. If you’re reading air mass wrong, you’re reading load wrong. Hence cars might have odd flat spots, or perhaps run into Knock where it shouldn’t or even throttle closures or boost spikes and dips.
What makes properly custom mapped cars so good to drive and so quick over generic mapped cars is quite often 50% or more down to just re calibrating the MAF sensor to the cars particular air intake system. Correcting the air flow reading will stop all fueling issues and will make the car fuel perfect. It will remove any hesitation and flat spots caused by the wrong spark angles and give perfect boost response as the engine load is being properly determined.
Some other MAF sensor issues caused by altering the car include restricting the air intake before the MAF. Some people do not modify the airbox when fitting the CDTI kit onto a car running the 80mm MAF. Because the box comes from a car that runs 70mm pipes it only has a 70mm outlet. This channels the air through the centre of the MAF and upsets its readings. It’s extremely important that you buy a kit already modified to 80mm if you need to use it on a car running an 80mm MAF, or you modify the box yourself.
Dump valves also wreck havoc to your MAF readings, the air that was metered by the MAF gets ejected without knowledge of the ECU to atmosphere. This means the can runs rich after a gear change and the car see’s this on the lambda sensors and pulls a fuel trim. But by then air flow is returning to normal which will then cause a moment of lean running as the fuel trim is reversed.
Here is a video of a car that was running with a generic flash map but then put on an open cone filter. The car lost a lot of power and you can clearly see the air fuel ratios run dangerously lean.
https://www.youtube.com/watch?v=Km-mR6Tgw1Q
Z16LEx/A16LEx Injectors – The Truth
It has been long debated whether or not the injectors fitted as standard to the Corsa VXR and similar engines are suitable for tuning. It’s been our long standing opinion that if you tune a car you use sensors and injectors which are suitable for the power you’re looking to run. So under that note, we will not tune a Corsa VXR beyond a soft stage 1 without uprated injectors fitted.
An injector has a certain amount of flow rate, this describes the amount of fuel it can flow in a set period of time. The injectors works by pulsing a valve open and closed very rapidly to squirt a very measured amount of fuel into the engine. The injector duty cycle is the amount of time this valve is open for verses the maximum possible amount of time available.
The maximum time an injector has is limited by the cycle of the engine; from the moment the intake valve closes the injector can start to fill the inlet port with fuel ready for the next cycle. As the engine nears the next cycle the inlet valve will open and the fuel will be consumed into the cylinder. The injector then has until the moment the inlet valve closes again to inject the last part of the required fuel – once this valve is closed no more fuel can get into the cylinder for this cycle and anymore will be contributed to the next engine cycle. If it’s not enough then the engine will run leaner than desired.
The exact amount of fuel required is determined by measuring the amount of air coming into the engine using the MAF sensor. The MAF sensors air reading is then divided up by the number of cylinders and the number of cycles the engine is completing in a set time.
For example your MAF sensor may read 1000 grams of air per second coming into your engine. The engine may be a 4 cylinder and rotating at 3000rpm. This means that the engine would be completing 25 cycles a second as it takes 2 revolutions to complete a cycle of all cylinders. So this 1000g of air will be divided by 25 cycles giving 40g per cycle and then divided by the number of cylinders giving 10g of air per cylinder per cycle.
The amount of fuel required then depends on the air fuel ratio you request the injector to provide. The air fuel ratio is merely how many parts of air to how many parts of fuel, a richer mixture with more fuel will require a longer injector on time, or pulse than less fuel or a leaner mixture. The correct air fuel ratio is important on a petrol engine, too rich you will bog down on power, cause smoke from the exhaust or risk bore wash inside the engine, too little and you could risk excessive uncontrolled cylinder temperatures leading to knock or damaged engine components.
Going back to our example, if you run the engine at 14.7:1 then it will only require 0.68g of fuel. If you however needed to run the engine richer at say 11.5:1 which is a very safe rich ratio it would then be required to deliver 0.87g of fuel to the cylinder for the same amount of air.
The exact point an injector runs out of capacity will depend on the level of power you wish to run and also the air fuel ratio you wish to use to make this power. Running a car a bit leaner at say 12.5:1 will lower the fuel requirement and make good power, but with less excess fuel for cooling the engine runs hotter and potentially more damage could occur.
If you run richer at around 11.5:1 the car will run cooler and much safe but you will use more fuel and your injector will max out sooner at a lower power output. The faster the engine rotates the less time each injector has to fill the cylinder with the required air, this is why the more you rev the engine the higher the duty cycle of the injector will be.
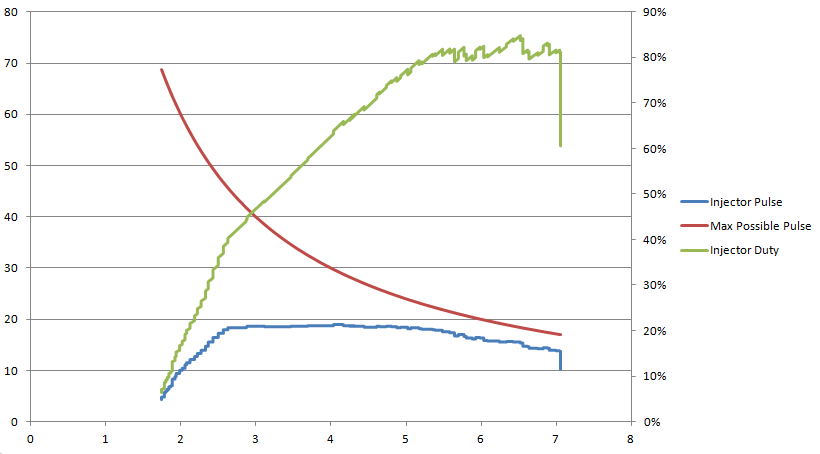
You can monitor your injector duty cycle by recording the engine speed and the injector pulse width with products such as opcom. You can then take this log and run it though a simple equation to calculate the duty cycle.
Injector Duty Cycle = Injector Pulse / (120,000 / RPM)
By using this equation you can see that a number of third party stage tuned Corsa’s do in fact max their injectors but not only at the top end but for a considerable part of the rev range, sometimes as low as 5000rpm.
This graph was taken from a car running a map from a well known third party handheld home tuning tool. The supplier has previously promised that the injectors do not run to their maximum on maps they provide with the tool but a simple data log shows otherwise.
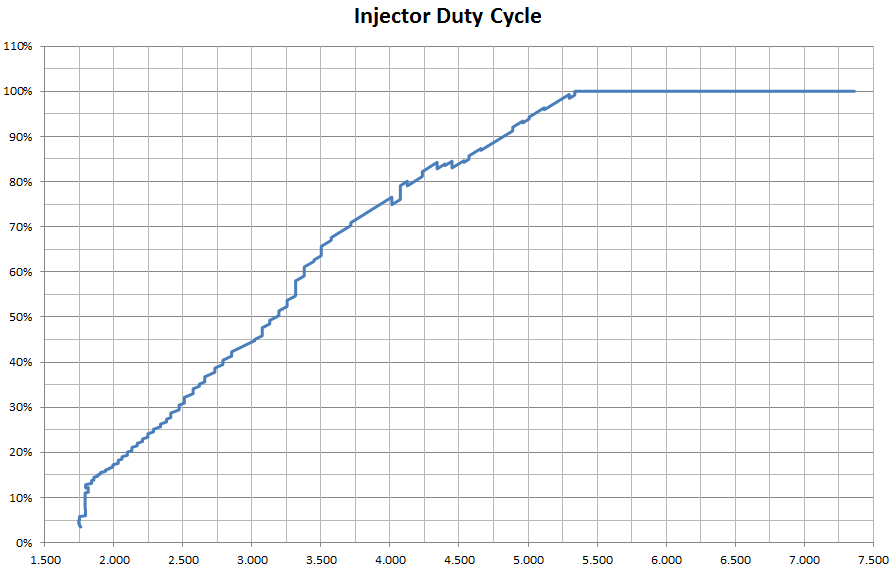
The above mentioned car was running air fuel ratios in the region of 12:1 through the mid range but 12.5:1 by the top end. The map in fact requested the air fuel ratio to be 11.8:1 under normal conditions and allowing up to 11:1 under high temperature conditions. Despite the map being set to request this, it is physically impossible for the car to add anymore fuel beyond 5,500 rpm therefore running considerably leaner than desired.
You should select an injector that is suited to run no more than around 85% duty cycle, this gives you capacity to allow the ECU to increase the fuel mixture to a richer ratio in order to provide extra cooling when things get hot. It also means as injectors get older and potentially clogged your fuel trims have the ability to adjust and increase the required pulse width to compensate. Finally on some ECU’s their injector driver circuits or injectors own coils, can be damaged by leaving the coil energized permanently, though this doesn’t appear to be an issue for this particular car.
Here is a WGM Motorworks Stage 3 Corsa VXR with our 395cc, showing 83% max duty.
Finally the most import thing to remember with injectors is they must suit the software on the ECU. This means you cannot just fit an injector without a suitable remap. If the ECU map is not calibrated with the correct constant valves for the injectors characteristics the ECU will be able to properly control the injector and damage to your engine may well occur.
At WG Motorworks we can supply and fit a number of injector types to the car suitable for a range of different power levels. We can supply injectors that are direct fit which require no machining or reworking of the inlet manifold. We also do not require adjustable regulators as we are able to correctly map the injector selected precisely using the standard regulator.
We recommend the following injector sizes:
395cc for up to 270bhp
540cc for up to 370bhp
630cc for up to 420bhp.
We can supply and fit the injectors as well as provide a calibrated remap for the injector, or we can re-calibrate existing remaps from third parties if you wish to add piece of mind by fitting injectors.
Intercoolers, are they all the same?
 Our test vehicle is an Astra VXR with a map and full 3″ exhaust system on which we compared different intercooler setups in average British summer conditions of 25 degrees celsius. We compared the standard intercooler when the vehicle was stage 2, with our preferred Airtec intercooler compared with a cheaper low cost kit based upon a universal intercooler.
Our test conditions was a 30-130 sprint and the difference in results may surprise.
The standard intercooler ran up to 63C, which was 38C above ambient.
The universal intercooler kit ran up to 57C which is 32C above ambient.
The Airtec intercooler kit ran up to 38C which is amazingly only 13 degrees above ambient.
After repeated back to back test runs the car also recovered and maintained this maximum temperature far far better than cheaper and standard kit.
From this high intake temperature we also observed that the car was experiencing reasonable knock though within the knock control limit on both the standard and universal kits. This means the car has its ignition timing already too advanced and timing is being retarded by the ECU to prevent damage.
Though when the ECU reacts it does take a large chunk of timing out which can leave a car feeling flat and less responsive and overall making less power.
But after fitting the Airtec we observed absolutely zero knock retard on all cylinders throughout the run. This shows that even more gains were available to the car and we were able to advance timing at WOT by 3-6 degrees across the rev range giving an even greater gain in power.
So to summarise, don’t skimp on your intercooler, it is an integral part of your setup giving strong gains and consistency in many weather conditions.
Update:
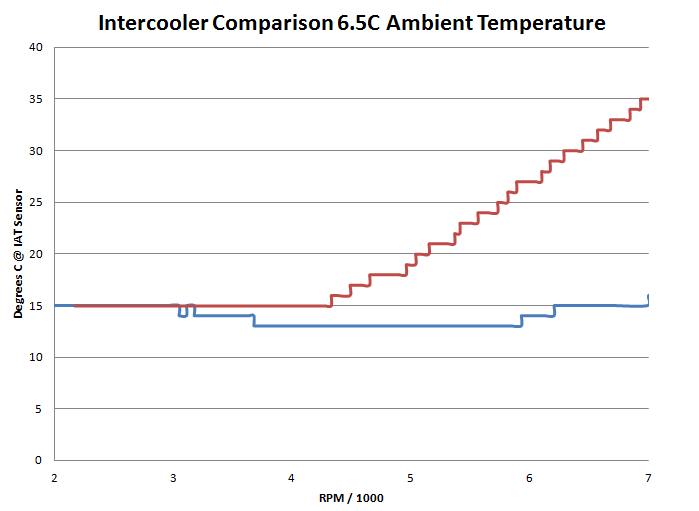
Here is a winter test between the airtec cooler, and another branded kit based upon a universal cooler. You’d think in the middle of November at just 6.5 degrees ambient that there would not be much difference, but on this day we were mapping two cars with the same level of tune with the two different intercoolers. As you can see even on a single pull on the same stretch of road in the same ambient conditions on the same day there is a BIG difference. It just goes to show how much a decent intercooler is really worth.
The red line shows the intake temperatures of the universal based kit, and the blue line the airtec kit on two Astra VXR Stage 3 cars. This also shows that the intercoolers are a worth while modification all year round and not just in the summer months.
Our test vehicle is an Astra VXR with a map and full 3″ exhaust system on which we compared different intercooler setups in average British summer conditions of 25 degrees celsius. We compared the standard intercooler when the vehicle was stage 2, with our preferred Airtec intercooler compared with a cheaper low cost kit based upon a universal intercooler.
Our test conditions was a 30-130 sprint and the difference in results may surprise.
The standard intercooler ran up to 63C, which was 38C above ambient.
The universal intercooler kit ran up to 57C which is 32C above ambient.
The Airtec intercooler kit ran up to 38C which is amazingly only 13 degrees above ambient.
After repeated back to back test runs the car also recovered and maintained this maximum temperature far far better than cheaper and standard kit.
From this high intake temperature we also observed that the car was experiencing reasonable knock though within the knock control limit on both the standard and universal kits. This means the car has its ignition timing already too advanced and timing is being retarded by the ECU to prevent damage.
Though when the ECU reacts it does take a large chunk of timing out which can leave a car feeling flat and less responsive and overall making less power.
But after fitting the Airtec we observed absolutely zero knock retard on all cylinders throughout the run. This shows that even more gains were available to the car and we were able to advance timing at WOT by 3-6 degrees across the rev range giving an even greater gain in power.
So to summarise, don’t skimp on your intercooler, it is an integral part of your setup giving strong gains and consistency in many weather conditions.
Update:
Here is a winter test between the airtec cooler, and another branded kit based upon a universal cooler. You’d think in the middle of November at just 6.5 degrees ambient that there would not be much difference, but on this day we were mapping two cars with the same level of tune with the two different intercoolers. As you can see even on a single pull on the same stretch of road in the same ambient conditions on the same day there is a BIG difference. It just goes to show how much a decent intercooler is really worth.
The red line shows the intake temperatures of the universal based kit, and the blue line the airtec kit on two Astra VXR Stage 3 cars. This also shows that the intercoolers are a worth while modification all year round and not just in the summer months.